ARPEGGIATOR - Introduction
ARPEGGIATOR - Introduction
An Arpeggiator receives incoming MIDI
notes, and outputs a sequenced pattern of notes based on a defined set of
rules. Similar in concept to a step sequencer, an Arpeggiator has a number of
differences that set it apart. Like a step sequencer, an Arpeggiator allows you
to create and transpose a pattern, but it also interacts directly with the
chords and intervals that you play. Omnisphere features a highly advanced,
next-generation Arpeggiator.
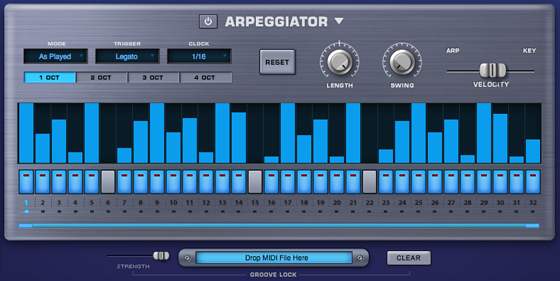
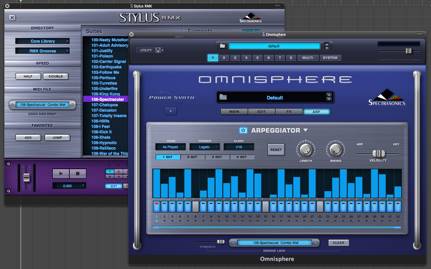
Omnisphere’s Arpeggiator has
multiple modes, trigger-types and clock rates, a variable length 32-step
Pattern Programmer, and also features the innovative Groove Lock™ feature that synchronizes the Arpeggiator with Stylus
RMX grooves (or any standard MIDI file).
Each Part in Omnisphere can have
its own Arpeggiator, each with it’s own unique pattern settings. This means that up to eight
Arpeggiators can be running simultaneously, which is especially powerful when
using Stack Mode.
There are many Arpeggiator presets
available to help get you started exploring the Arpeggiator’s
capabilities. Selecting the
different Arpeggiator presets will allow you to check out the some examples of
arpeggio patterns that can be created. Arpeggio patterns that you create or
modify can be saved as presets for later use.
POWER BUTTON

To engage the Arpeggiator select
the power button.
ARPEGGIATOR - Presets
ARPEGGIATOR - Presets
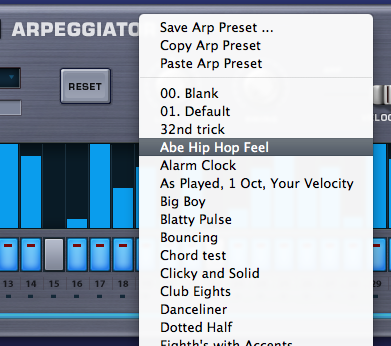
Selecting the down-arrow on the right side of the
ARPEGGIATOR label will reveal the Presets menu, which has save/copy/paste
options and a menu of Arpeggiator preset patterns. Any custom arpeggios can be saved as presets. You can also copy and paste
patterns between Omnisphere’s Parts with the Copy/Paste functions.
ARPEGGIATOR - Mode
ARPEGGIATOR - Modes
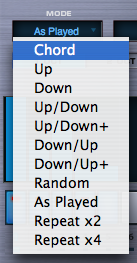
There are eleven different Arpeggiator modes
available which determine the way the Arpeggiator outputs notes. Clicking on
the MODE field will reveal the available modes.
Chord – all the notes held in a chord will be triggered at the same time, based
on the velocity value of each step.
Up – all the notes held will be played in an ascending arpeggio.
Down – all the notes held will be played in a descending arpeggio.
Up/Down – all the notes held will first be played ascending, then
descending.
Up/Down+ - similar to Up/Down,
Up/Down+ repeats the upper note and the lower note, instead of just playing
them once.
Down/Up – all the notes held will first be played in a descending
arpeggio, then an ascending arpeggio.
Down/Up+ - similar to Down/Up, Down/Up+ repeats the lowest and highest notes
when it reverses direction.
Random – All the notes held will be played in random order in the
arpeggio.
As Played – The notes are played in the order they are triggered.
Repeat X2 – Every note in the arpeggio will be repeated twice, in
ascending order.
Repeat X4 – Every note in the arpeggio will be repeated four times, in
ascending order.
ARPEGGIATOR - Trigger
ARPEGGIATOR - Trigger
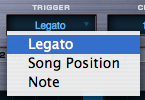
Legato
The Arpeggiator will continue through all of the
steps in the pattern as long as notes are played legato. If staccato notes are played, the
Arpeggiator will restart from the beginning of the pattern.
Song Position
The Arpeggiator will follow the song position
(bar & beats) of the host.
Note
Every time a new note is triggered, the
Arpeggiator will restart from the first step.
ARPEGGIATOR - Clock
ARPEGGIATOR - Clock
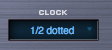
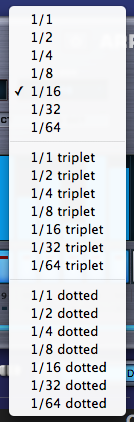
The clock setting lets you change the internal resolution of the pattern, and determines the time value of each step. For example, if you select 1/8 then each step in the Arpeggiator will be equal to an eighth note. In addition to straight steps, triplets and dotted note values are available from the Clock menu.
Available ranges are:
Straight steps: 1/1 ~ 1/32
Triplets: 1/1 triplet ~ 1/64 triplet
Dotted notes: 1/1 dotted ~ 1/64 dotted
ARPEGGIATOR - Octave
ARPEGGIATOR - Octave

1 OCT
The Arpeggiator will play back a pattern based
only on notes that are being held on the MIDI controller.
2 OCT
The Arpeggiator will play back a pattern based on
notes being held on the MIDI controller, followed by the same pattern one
octave higher.
3 OCT
The Arpeggiator will play back a pattern based on
notes being held on the MIDI controller, followed by the same pattern one
octave, then two octaves higher – over a three-octave range.
4 OCT
The Arpeggiator will play back a pattern based on
notes being held on the MIDI controller, followed by the same pattern one
octave, then two octaves, and again three octaves higher – over a
four-octave range.
ARPEGGIATOR - Reset
ARPEGGIATOR - Reset

When selected, the pattern will immediately reset
to the first step.
NOTE: Using Reset will start
playback from the first step regardless of Trigger mode.
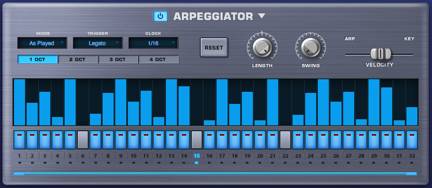
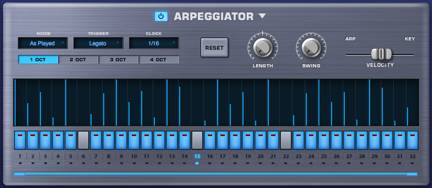
ARPEGGIATOR - Length
ARPEGGIATOR - Length

Allows the overall length of all events in the
arpeggio to be shortened or lengthened. In the example below, the length of each event is at maximum length.
After changing the Length control to its minimum
value, all of the events are a very short duration.
NOTE: Changing the length of
individual events is discussed in the Pattern Programming section.
ARPEGGIATOR - Swing
ARPEGGIATOR - Swing

At the minimum setting, all the events are
aligned straight to the tempo grid. As the control’s setting is increased, the events will have a greater
swing groove. At high settings the
swing will be very exaggerated.
NOTE: If the Swing control is selected, the Groove-Lock Strength slider will be forced to maximum setting, which is how it’s designed to work.
ARPEGGIATOR - Velocity
ARPEGGIATOR - Velocity
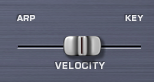
This control determines how much the velocity of
incoming notes affects the dynamics of the Arpeggiator pattern. At maximum setting, keyboard velocity
overrides all of the velocity settings in the Arpeggiator’s steps. As the setting gets closer to minimum,
the velocity values of each step will determine the dynamics of the Arpeggiator
pattern. Generally a setting of
50% is a good balance, since it allows the incoming MIDI velocity to interact
with the dynamics of the pattern.
ARPEGGIATOR - Pattern Programming
ARPEGGIATOR - Pattern Programming
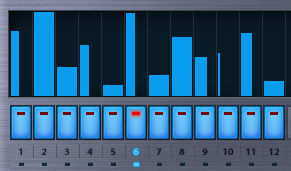
Omnisphere’s Arpeggiator can have up to 32 steps
in a pattern. Each step can have
it’s own length and velocity value.
To change the velocity of a step, click and hold
at the top of the step and drag it up or down to raise or lower the velocity
value of the step.
Two or more steps can be combined to create a
tie. The fastest way to “tie”
steps together is to double-click the next step to the right. It is also possible to finely adjust
the duration of an individual step by holding down SHIFT while dragging the
right edge of the bar horizontally until the desired length is achieved. If the subsequent step of the pattern
is empty, the duration of a step can be dragged into the empty step, also
creating a musical ‘tie’.
ARPEGGIATOR - Range
ARPEGGIATOR - Range

The thin blue bar under the steps determines how
many steps the pattern will have. To change the number of steps, select the right end of the Range Slider
and drag it until the desired number of steps is set.
NOTE – Dragging the Range
Slider will not delete any steps – it just hides them, so you can access
these hidden events again by simply increasing the range slider to the right.
Range 1-32
ARPEGGIATOR - Groove Lock™
ARPEGGIATOR - Groove Lock™

Groove Lock™ is one of Omnisphere’s most innovate
new features. In the past, arpeggiators have always had a fixed timing, so
they’ve had limited usefulness in genres outside of electronic music. With
Groove Lock™ you can lock the groove of the Arpeggiator to the feel of any
Stylus RMX or Standard MIDI file. This dramatically expands the rhythmic
potential of the Omnisphere Arpeggiator.
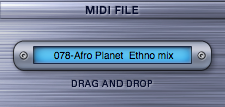
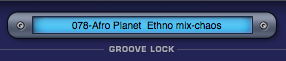
Any MIDI data from Stylus RMX – including
Grooves that have had Chaos applied to them - can be dragged from Stylus RMX’s
MIDI File field into Omnisphere’s Groove Lock™ field. The name of the RMX Groove is also carried over.
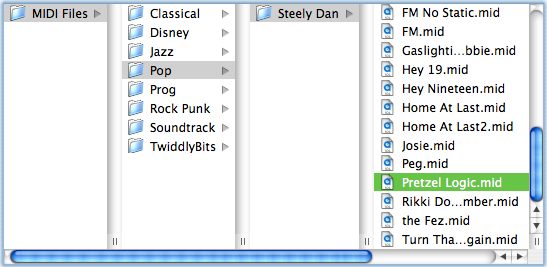
As well, the feel of any standard MIDI file can
be used as a reference for Groove Lock™. This is achieved by loading a standard
MIDI file into Groove Lock™ using drag and drop or the MIDI file browser. This
is explained in the MIDI file browsing section.
Grooves can be dragged from either of Stylus
RMX’s two MIDI File fields, located on the Directory page and on the Chaos
page.
Stylus RMX Directory Page
Stylus RMX Chaos Page

Click and drag the name of the MIDI file from
Stylus RMX into the Groove Lock™ field below the Arpeggiator display to lock
the feel of Omnisphere and Stylus RMX together.
Groove Lock™ is not limited to Stylus RMX MIDI
data, any standard MIDI file can be dragged into Omnisphere’s Groove Lock™
feature. This is explained in the MIDI file browsing section.
ARPEGGIATOR - Groove Lock™ - Strength
GROOVE LOCK™ - Strength & Clear

Strength is a blend control that determines how
much the imported MIDI groove will affect the feel of the Arpeggiator’s
pattern. At minimum setting,
Omnisphere will ignore the imported MIDI groove in favor of a standard,
straight ‘grid’ feel. With
Strength set to maximum, the imported MIDI groove will completely override the
grid and base the feel of the Arpeggiator’s pattern on the imported groove.

Clears the MIDI file from the from the Groove
Lock™ field.
ARPEGGIATOR - Groove Lock™ - MIDI File Browsing
GROOVE LOCK™ - MIDI File Browsing

In addition to drag and drop, it’s also possible
to click inside the Groove Lock™ field to open a file dialog, which allows
browsing to any .MID file on your computer that you wish to import into the
Arpeggiator.

NOTE: Omnisphere will only
recognize the first 128 MIDI note events in a .MID file, so any subsequent
notes are ignored.
ARPEGGIATOR - Groove Lock™ - Indicator Dots
GROOVE LOCK™ - Indicator Dots
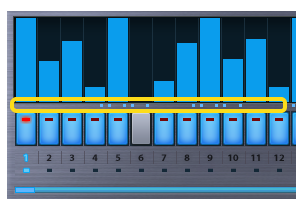
When a MIDI file has been imported or dragged
into the Groove Lock™ field, a series of small blue dots will appear directly
below the Arpeggiator steps. These
dots serve a dual purpose. They
confirm that Groove Lock™ has received MIDI data and provide a visual reference
for the feel of the MIDI content. Changing the Arpeggiator’s Clock value will change the resolution of the
blue dots.
Arpeggiator Clock set to 1/8

Arpeggiator Clock set to 1/16

The Groove Lock™ feature uses the timing and note
values of the MIDI content, not the melodic value. This means that Omnisphere
locks to the feel or groove of the clip, not to the musical pattern itself.
This applies to polyphonic MIDI files as well.