CONCEPTS - Introduction
CONCEPTS - Introduction
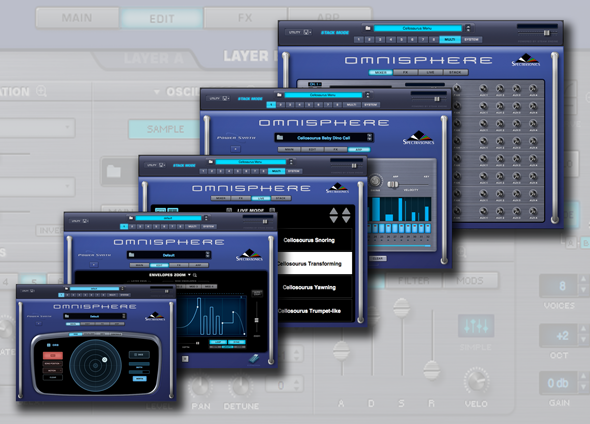
Omnisphere has been designed to accommodate a
wide range of operation, from basic interaction with Factory Patches, to
comprehensive and complex sound design. Overall, the Omnisphere interface
provides an accessible and intuitive workflow, but it also offers as much depth
and flexibility as a User needs for their desired application.
CONCEPTS - STEAM™ Engine
STEAM™ Engine

The STEAM™ Engine is a core technology that was created by the Spectrasonics in-house development team, and will be used as the basis of all future Spectrasonics performance instruments. Like our core S.A.G.E. technology, used for groove-based instruments like Stylus RMX, STEAM™ is important to our future because it completes the technology transition from earlier performance virtual instruments that were based on the licensed UVI Engine.
Virtual instruments built with the multitimbral STEAM™ Engine offer many development possibilities into a variety of hybrid synthesis and control capabilities. These include high-resolution Streaming Sample Playback, Integrated FX, Variable Waveshaping synthesis, Granular synthesis, FM synthesis, polyphonic Ring Modulation, Timbre Shifting, and a comprehensive Flex-Mod™ modulation routing system, to name a few.
The STEAM™ Engine also enables a more efficient response to technology changes like 64-bit computing or a major new operating system. The new in-house technology allows us to create instruments that can be fully supported across industry changes and allows new innovations and faster transitions in the future.
Just as Stylus RMX, based on S.A.G.E. technology, made early compatibility with Apple’s Intel-Macs possible, new instruments based on STEAM™ technology will make future transitions like these much easier on our customers.
Using STEAM™, new products are being created from the ground up that support Spectrasonics’ long-term vision of the highest-quality sounds and the most musically intuitive user experience.
Virtual instruments powered by STEAM™ also have unlimited expansion possibilities. The new core software is flexible and open - allowing patches to be shared across hosts and computer platforms. New patches and sounds can be added to the core library, giving the user an ever-expanding sonic palette. In addition, all Spectrasonics virtual instruments based on S.A.G.E. and STEAM™ technologies can interact in musically useful and innovative ways for a smoother creative flow.
CONCEPTS - The MULTI
CONCEPTS - The MULTI
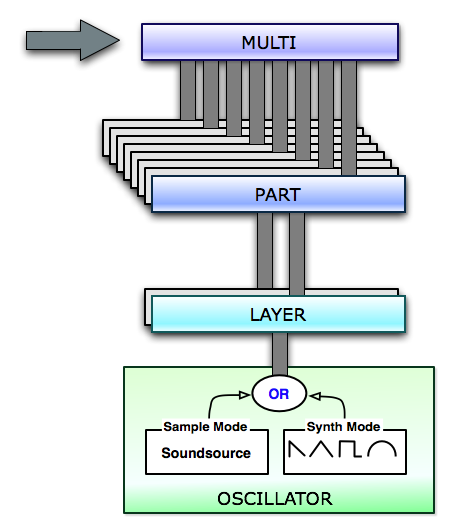
The MULTI is at the top of Omnisphere’s hierarchy
and consists of up to eight Parts, together with four Aux FX Racks and a Master
FX Rack.
The Multi Section contains four pages: MIXER, FX, LIVE and STACK. These
allow access to a full-featured MIXER, the Multi FX, and two flexible
performance modes: LIVE MODE and STACK MODE, which provide interactive
environments for both composition and live performance. These sections are
covered in detail in their respective sections of the Reference Guide.
Saving a MULTI is like saving the entire state of
the plug-in for future recall. A
MULTI stores all of the settings from the MIXER page, the Multi FX, the LIVE
MODE and STACK MODE pages, all MIDI Learn assignments, and all of the settings
(including any unsaved edits) for each of the eight Parts.
All of Omnisphere’s settings are saved and
recalled with a project in your plug-in host software.
Saving an individual MULTI lets you recall the
entire saved state of the plug-in and load it at a later time into new
instances of Omnisphere (or new projects) by loading the MULTI from the MULTI
Browser.
CONCEPTS - Parts and Patches
CONCEPTS - Parts & Patches

Omnisphere is a multi-timbral instrument,
allowing up to eight different Parts to be played at the same time within a
single instance of the plug-in.
Each of the eight Parts can be thought of as an
entire synthesizer, complete with its own oscillators, modulation routings, and
FX, and each Part can be played on a different MIDI channel.
The settings of all eight Parts are saved with a
MULTI, or with your project. Everything will be recalled by loading that
specific MULTI or project. The settings of a Part can also be individually
saved as a Patch.
A Patch contains all the settings that make up a
sound, and can be individually loaded into any of the eight Parts.
CONCEPTS - Layers and Oscillators
CONCEPTS - Layers & Oscillators
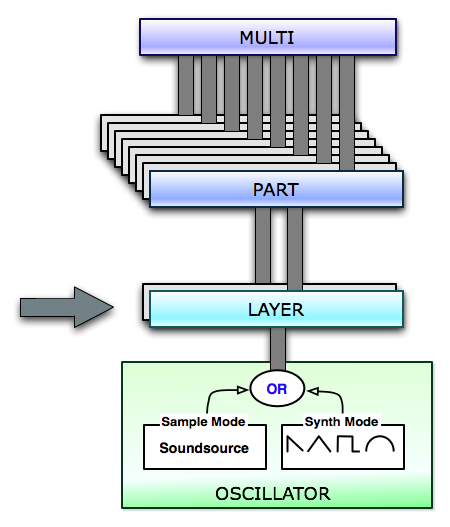
Each Part has two Layers (A and B), and each
Layer has a set of synthesis controls.
Each Layer has its own polyphonic Primary
Oscillator, which can be set to either Sample Mode (using Soundsources) or
Synth Mode (using DSP Waveforms). Because each Layer has its own independent
Primary Oscillator, you can mix and match the modes by using two Layers.
Using Omnisphere’s unique Harmonia feature, each
Layer can add up to 4 additional oscillators, giving a single Part as many as
10 separate oscillators!
To learn more, please refer to the extensive Oscillator section of the Reference Guide.
NOTE: It isn’t necessary to use
both Layers when creating sounds. In fact, very complex sounds can be achieved
using only one Layer.
CONCEPTS - Soundsources
CONCEPTS - Soundsources
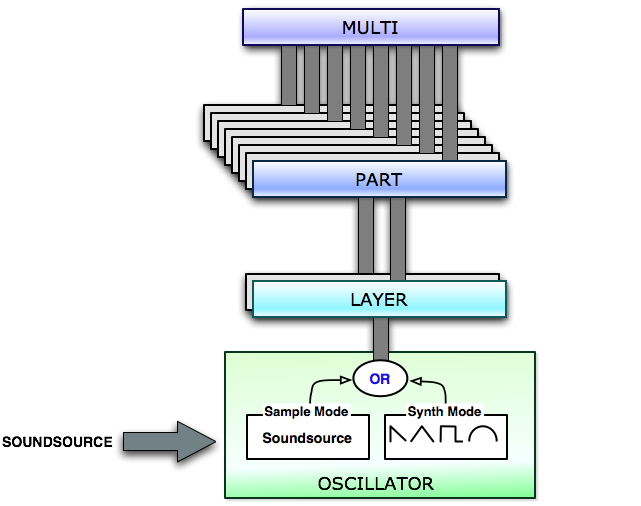
Soundsources
allow Omnisphere’s synthesis to begin with sampled sounds instead of DSP
waveforms. They are accessed by selecting Sample Mode in the Oscillator.
Soundsources are based
on a ‘map’ of audio samples stored in the Core Library of Omnisphere in
Spectrasonics’ proprietary STEAM format. A Soundsource can be as simple as a
single sample stretched across the keyboard range or as complex as hundreds of chromatically
sampled, velocity-switched multi-samples – like you’d find in a modern
sample library.
Omnisphere’s Core
Library Soundsources vary dramatically in size - from a few kilobytes to nearly
a gigabyte each! Each Soundsource was carefully prepared and optimized by the
Spectrasonics Sound Development team.
Larger and more
complex Soundsources take a longer to load, but still load relatively quickly,
since the STEAM Engine includes “streaming” technology to allow for playback of
very large multisamples. Streaming allows for the samples to buffer off of the
computer’s hard drive in realtime, instead of all of the samples having to be
loaded into the computer’s RAM memory.
Soundsources in
Omnisphere are similar to using “programs” in a sampler, but there are some key
differences:
1. A Soundsource
contains not only all of the raw samples, mapping information, such as pitch,
velocity, zones, and loop points – but also Soundsource images, notes and
tags.
2. Soundsources do not
include envelopes, filters, LFOs, FX or any modulation settings. (which are
stored in the Patch)
For this reason,
you can load a new Soundsource into a Layer, without changing any of the
Layer’s synthesis settings. This is extremely useful, because you can take any
patch you like and have thousands of variations simply by changing the
Soundsource!
Most importantly,
the concept of Omnisphere is completely different than a typical sampler.
Omnisphere is an incredibly deep synthesizer with a massive Core Library that will
take a lifetime to explore!
The Factory Core
Library of Omnisphere is over 42Gb and includes over 2700 Soundsources
specifically designed to work well with the STEAM engine synthesis. The Factory
Core Library covers a wide spectrum of sounds, from simple raw waveforms to
psychoacoustic samples, morphing textures, and a best-of selection from our
award-winning sample libraries. The STEAM engine architecture allows
Spectrasonics to expand Omnisphere with new Soundsources in the future as well.
Spectrasonics is
constantly improving and adding to the Factory Soundsource Library, so make
sure you stay up to date with the “Check for Updates” feature.
NOTE: Although version 1.5 of Omnisphere doesn’t currently support user importing of samples, it’s a very popular request and we certainly wouldn't rule that out as a new feature for Omnisphere’s future.
CONCEPTS - Common Parameters
CONCEPTS - Common Parameters
 ....
....
Each Layer has an independent set of synthesis
controls, and there are many parameters that will only affect the individual
Layer. However, there are also a number of Common parameters that are shared by
both Layers in a Part.
If a parameter is numbered, then it’s a Common
parameter that can be used by both Layers (ex: LFO 1 ~ 6, Mod Env. 1 ~ 4). If
it isn’t numbered, then it’s specific to the Layer (ex: Amp Env., Filter Env.).
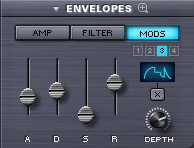
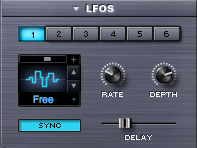
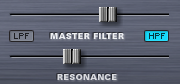
Common parameters include the six LFOs (LFO1 ~
LFO6), the Master Filter, and the four Modulation Envelopes (MOD 1 ~ MOD 4).
In addition, each Layer has its own FX Rack, and
there is a Common FX Rack that is shared by both Layers. For additional detail, refer to FX Architecture
CONCEPTS – The Header
CONCEPTS - The Header
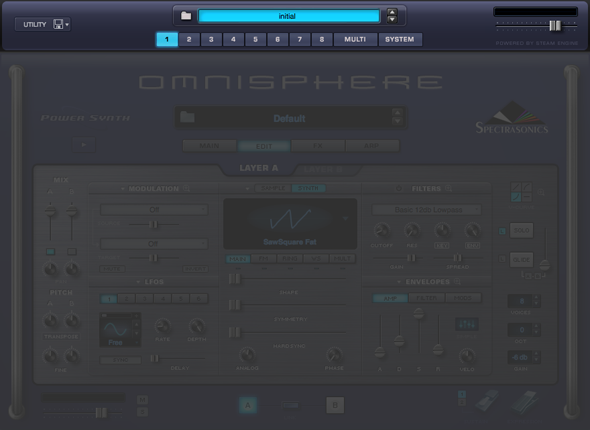
The top area of the
Omnisphere interface is the Header. The Header is visible from any page in
Omnisphere, and is the primary navigation area of the interface.
The Header contains the
Utility Menu, Multi Information including the Multi Name Display and access to
the MULTI Browser, indicators for when LIVE MODE or STACK MODE are enabled, and
Navigation Buttons for selecting any of the 8 Parts, the MULTI Section or the
SYSTEM Page. Finally, there is a Master Volume Control for adjusting the
overall output level.
CONCEPTS – Utility Menu
CONCEPTS – Utility Menu

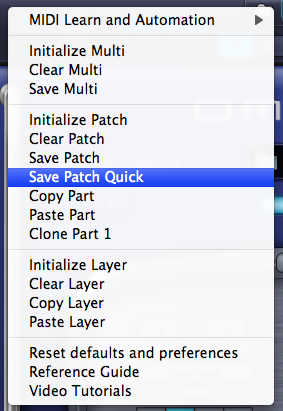
The Utility Menu has three sections. The first is a MIDI Learn and Automation sub-menu. The second provides various Initialize, Clear, Save, Copy & Paste functions for Multis, Patches, Parts and Layers. The third section provides a “factory reset“ option and direct access to the Omnisphere Reference Guide and Tutorials.
CONCEPS - MIDI Learn
CONCEPTS - MIDI Learn
The Utility Menu provides the MIDI Learn and Automation options that apply to the whole plug-in. These include MIDI Learn Templates, Unlearn All, and access to a ‘Current Assignments’ Report. See the MIDI Learn & Automation section for details.
CONCEPTS - Clear, Save, Copy & Paste
CONCEPTS - Clear, Save, Copy & Paste
The Utility Menu provides options to Initialize or Clear Multis, Patches and Layers, and to Save Multis and Patches. There are also functions that allow Part and Layer settings to be copied and pasted.
Initialize vs Clear (Multi, Patch & Layer)
When you select Initialize (Initialize Multi, Initialize Patch or Initialize Layer), all synthesis parameters for the Multi, Patch or Layer, will be restored to an unedited 'default' state, including a default Soundsource, loaded as a starting point.
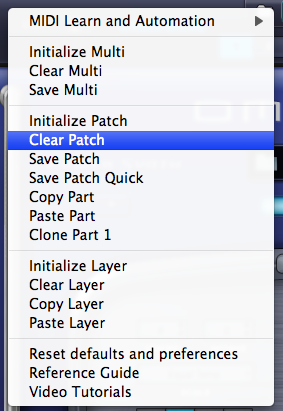
When you select Clear (Clear Multi, Clear Patch or Clear Layer), all existing parameters for the Multi, Patch or Layer will be completely cleared, using no sounds or memory.
In all cases, the Mixer settings are retained
NOTE: When using the Clear function, no sounds are loaded, so no sound will be heard from the Multi, Patch or Layer until a Soundsource is loaded.
Initialize Multi
Initializes all current Multi settings, including all Parts and FX. The Multi is returned to an unedited ‘default’ state, including default sounds.
Clear Multi
Clears all current Multi settings, including all Soundsources, Parts and FX. This will result in a completely empty Multi.
Save Multi
Selecting the Save Multi option will open a File Save dialogue. After naming and saving the MULTI, the EDIT TAGS interface will open, allowing you to assign various Attribute Types and Assignments, add custom Assignments, and add your own Keywords and Notes to the MULTI.
Once you have finished editing the tags, click the SAVE button to finish saving the MULTI. You may also cancel the save process by clicking the CANCEL button.
When saving a MULTI, the entire state of the plug-in is saved. This includes the MIXER, LIVE MODE and STACK MODE settings, Multi FX, MIDI Learn assignments, as well as all Part settings. Even if a Part has been modified but not yet saved as an individual Patch, its settings will also be saved with the MULTI.
Initialize Patch
Initializes all current Patch settings, including all Modulation routing and FX. The Patch is returned to an unedited ‘default’ state, including the default sound
Save Patch
Selecting the Save Patch option will open a File Save dialogue. After naming and saving the Patch, the EDIT TAGS interface will open, allowing you to assign various Attribute Types and Assignments, add custom Assignments, and add your own Keywords and Notes to the Patch.
NOTE: Patches must be saved into a Category folder in the STEAM folder. This can be either an existing folder, or a user-created folder inside the Patches folder
Once you have finished editing the tags, click the SAVE button to finish saving the Patch. You may also cancel the save process by clicking the CANCEL button.
Save Patch Quick
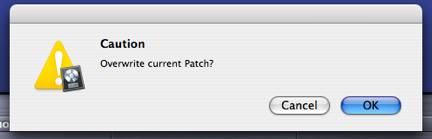
When editing an already saved Patch, the new changes can be saved without having to bring up the save dialogue and Tag Editor. Save Patch Quick will simply overwrite the previous version. A confirmation dialogue will pop-up to confirm the save.
Copy Part
This command is used to copy the settings from a single Part. These settings can then be pasted to another Part using the Paste Part command. To copy a Part, select the Part using the Navigation Buttons in the Header, and then select the Copy Part command from the Utility Menu.
Paste Part
After a Part has been copied using the Copy Part command, it can be pasted to another Part. To paste a copied Part, select the destination Part using the Navigation Buttons in the Header, and then select the Paste Part command from the Utility Menu.
Clone Part 1
Selecting “Clone Part 1” copies Part 1 to Parts 2-8. This allows for making edits in Part 1, and then easily copying it to the other parts so all parts have the same Patch.
“Clone Part 1” facilitates the use of Omnisphere with advanced MIDI controllers like a MIDI guitar, Haken Continuum, EigenHarp, MorphWhiz MIDI, etc., which have the ability to send MIDI messages in non-traditional ways. For example, on a MIDI guitar, each string is usually set to its own channel, and on the Haken Continuum and the Eigenharp, a new channel is picked for each successive note that is played.
Using this feature with advanced controllers such as these expands the performance capabilities of Omnisphere by allowing pitch-bend and other Continuous Controller MIDI messages on individual notes. This is made possible by sending out consecutive notes on different MIDI channels.
NOTE: Be sure to check the Clone Part 1 MIDI Learns & Make Omni section
Initialize Layer
Initializes all settings for the selected Layer, restoring all synthesis parameters to an unedited ‘default’ state, and includes the default sound.
NOTE: Because modulation routings can transcend a single layer, the Mod Matrix is a property of the Part, not the Layer. For this reason, initializing a Layer does not affect existing modulation routings.
Clear Layer
Clears all settings for the selected Layer, including all Soundsources, Modulation routing and FX. This will result in a completely empty Layer.
Copy Layer
This command is used to copy the settings from a single Layer. These settings can then be pasted to another Layer using the Paste Layer command. To copy a Layer, select it using the Layer tabs in the Edit Page, and then select the Copy Layer command from the Utility Menu.
Paste Layer
After a Layer has been copied using the Copy Layer command, it can be pasted to another Layer. To paste a copied Layer, select the destination Layer using the Layer tabs in the Edit Page, and then select the Paste Layer command from the Utility Menu.
NOTE: Modulation Routings are not included with the settings that are copied and pasted using the Copy/Paste Layer commands.
CONCEPTS - Reference Guide
CONCEPTS - Reference Guide
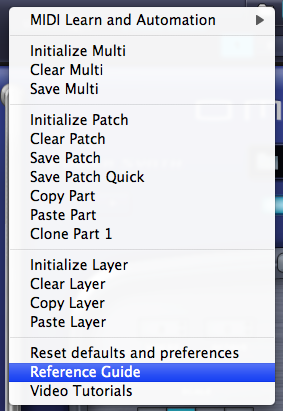
Selecting this
option from the Utility Menu will open Omnisphere’s HTML Reference Guide. The
Reference Guide will be displayed using your default Web Browser.
The Reference Guide
is indexed, so you can search the Guide, print chapters (click the Print Icon
next to any chapter to load printable pages), or save it as a PDF. Refer to
your system guide for how to create PDFs.
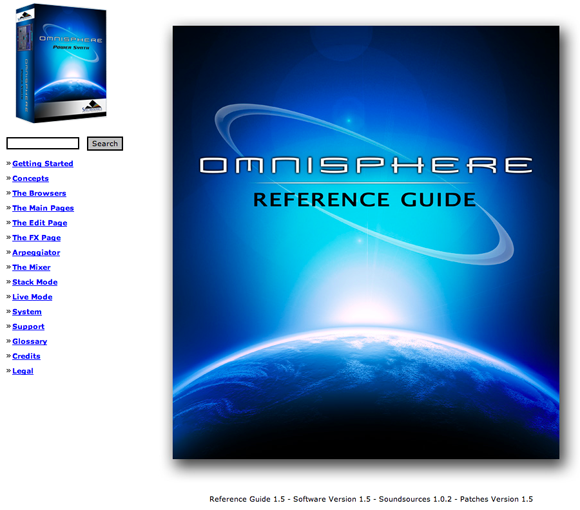
The Guide is in HTML
format, so is portable and can be opened with any Web Browser. This makes it
easy to keep up to date, and is very convenient for users. For example, it can
be copied to a mobile computer for reference, separate from the plug-in.
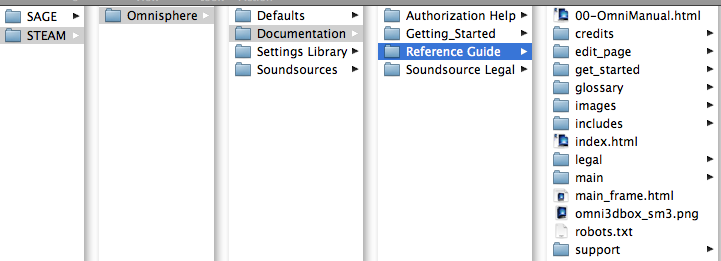
The Reference Guide
files are found inside the STEAM folder, under Documentation.
Windows: C:\Program Files\Spectrasonics\STEAM\Omnisphere\Documentation\Reference Guide\index.htnl
Mac: Macintosh HD/Users/Username/Application Support/Spectrasonics/STEAM/Omnisphere/Documentation/Reference Guide/index.html
CONCEPTS - Video Tutorials
CONCEPTS - Video Tutorials
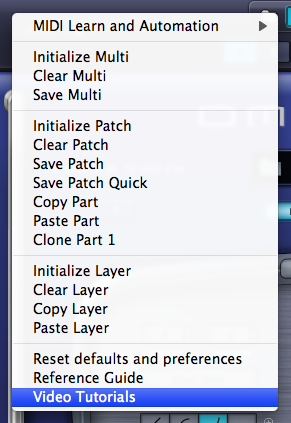
Selecting the “Video Tutorials” option from the Utility Menu will open your default web browser and load the Video Tutorials page from the Spectrasonics website.
This option provides convenient access to all available video tutorials located online in the Support Knowledge Base. You can play the tutorials directly or download them to your system for later viewing.
NOTE: Your computer must be connected to the Internet for this menu option to function correctly.
CONCEPTS - LIVE MODE/STACK MODE Indicators
CONCEPTS - LIVE/STACK MODE Indicators
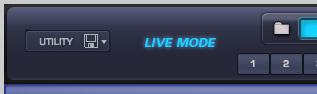
When either LIVE MODE or
STACK MODE is enabled, you’ll see “LIVE MODE” or “STACK MODE” displayed on the
left side of the Omnisphere header.

CONCEPTS - Multi Display
CONCEPTS - Multi Display

This part of the Header
contains the Multi Name Display, Multi Steppers, and a Folder icon for access
to the Multi Browser.
Selecting the Folder
icon, or anywhere inside the Multi Name Display, will open the Multi Browser.
After a MULTI has been loaded, the name of the MULTI will be displayed in the
Multi Name Display.
The Multi Stepper
buttons (up/down arrows) will load the next or previous MULTI from the Library,
based on the current filtered results in the Multi Browser. The buttons step
through the available MULTIS one at a time.
CONCEPTS - Navigation Buttons
CONCEPTS - Navigation Buttons
The Navigation Buttons
in the header are used to select and view any of the eight Parts, the Multi
Section or the System Page. Only one button can be selected at a time.
Part Select Buttons (1 ~ 8)

Buttons 1-8 are Part
Select Buttons. Selecting a Part lets you access and view any of the pages for
that Part, including the MAIN
page, EDIT page, Patch FX pages,
and the Arpeggiator Page.
MULTI Button

Selecting the MULTI
button gives you access to any of the pages in the Multi Section, including the MIXER, Aux/Master FX,
and the LIVE MODE and STACK MODE pages.
SYSTEM Button

Selecting the SYSTEM button
opens the System page, which contains preferences and settings for the entire
plug-in.
CONCEPTS - Master Volume Control
CONCEPTS - Master Volume Control
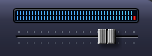
The Master Volume slider
controls the output of the whole plug-in, and includes a meter, which provides
a reference to the output signal. The range of the Master Volume slider is
–inf dB ~ 9.54 dB.
CONCEPTS - Drop-down Menus (Down Arrows)
CONCEPTS - Drop-down Menus (Down Arrows)


A downward facing arrow
indicates that a drop-down menu is available. There are numerous drop-down
menus in the Omnisphere interface, which provide access to settings, Presets,
MIDI Learn, Automation and other functions.
CONCEPTS - Contextual Menus (Right/Control-Click)
CONCEPTS - Contextual Menus (Right/Control-Click)
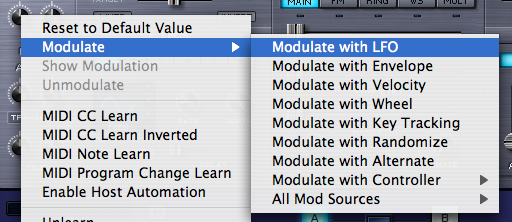
Contextual Menus are an
important part of the Omnisphere interface, and provide convenient access to
many important functions.
Right/Control-clicking
almost anywhere in the Omnisphere interface will bring up a contextual menu.
The contents of the menu will depend on where the cursor is placed when the
contextual menu is opened.
For example,
Right/Control-clicking over a blank area of the Omnisphere Header will reveal
the Utility Menu. Right/Control-clicking a knob or slider will typically reveal
a menu of MIDI Learn, Modulation & Automation options.
CONCEPTS - Up/Down Steppers
CONCEPTS - Up/Down Steppers

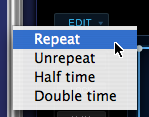
Steppers (up/down
arrows) are located throughout the Omnisphere interface, and are used to step
through values or load saved settings, incrementing or decrementing one at a
time. In the picture above, clicking the arrows will step through the different
LFO waveforms available.
CONCEPTS - Zoom Icon Buttons
CONCEPTS - Zoom Icon Buttons


One of the features of
Omnisphere’s interface design is that it only reveals its depth and complexity
on an as-needed basis. The Zoom Icon Buttons provide access to Zoom Views,
where you can view expanded information or interact with Omnisphere’s more
advanced features.
A magnifying glass icon
next to a function indicates that a Zoom View is available. Selecting the icon
with a ‘+’ inside it opens the Zoom View for that function. When a Zoom View is
open, selecting the magnifying glass icon with a ‘-‘ inside it, closes the Zoom
View.
Zoom Views are available
for Modulation, Filters, Envelopes, Velocity Curves, Soundsource info, Patch
info, MULTI info and LIVE MODE settings.
There are also Zoom
Buttons in the Browsers that access Browser settings, the Tag Editor, and
Multi, Patch or Soundsource info.
CONCEPTS - Folder Icon Buttons (Browser Access)
CONCEPTS - Folder Icon Buttons (Browser Access)


There are three Browsers
built in to Omnisphere, one each for Multis, Patches, and Soundsources. All
three Browsers have identical functions, but access different parts of the Core
Library.
Anywhere that you see a
Folder icon, you will be able to access a Browser by clicking on the Folder. If
there is a Name Display next to the Folder icon, you can also click inside the
Name Display to open the Browser.
Multi Browser
The
MULTI Browser can only be accessed from the main Header, but is always visible
and available from any page in Omnisphere.
Patch Browser
The
Patch Browser is accessed from the Patch Name Display, and when a Part is
selected (using the Part 1 ~ 8 Buttons) is always visible and available from
any of the Part pages.
The Patch Browser can also be accessed from
the Mixer page (Patch Name Displays), and from the LIVE MODE page when Mixer
Controls are enabled.
Soundsource Browser
The
Soundsource Browser is accessed from either the Main Page or the Edit Page.
To learn more about the
Browsers in Omnisphere, please see the Browser section
of the Reference Guide.
CONCEPTS - Knobs & Sliders
CONCEPTS - Knobs & Sliders
Using a mouse, Knobs and
Sliders (vertical and horizontal) are adjusted by clicking and dragging.
Shift-click and drag for more precise adjustments. Most Knobs and Sliders in
Omnisphere can be MIDI Learned for direct control from a MIDI device.
Knobs

Vertical
Sliders

Horizontal
Unidirectional Slider

Horizontal
Bidirectional Slider

Mini
Sliders

CONCEPTS - Floating Parameter Values
CONCEPTS - Floating Parameter Values

Adjusting Knobs and
Sliders will display their current setting or value in a floating display above
the controls. Holding down the SHIFT key while adjusting Knobs and Sliders
allows for more precise adjustments.
CONCEPTS – Buttons
CONCEPTS - Buttons
Buttons are used for
choosing sections or selecting from among multiples of a single type. When
selected, Buttons will be highlighted in blue. For example, there are 6 LFO
Buttons. When one of them is highlighted it means it is selected, and that
LFO’s settings are displayed.
Page
Buttons (raised
button)

Sub-Page
Buttons (smaller
raised buttons select sub-pages)

CONCEPTS - Switches (Toggles)
CONCEPTS - Switches (Toggles)
Switches let you toggle
certain parameters on and off or switch between multiple options. When a
parameter is enabled or selected, the switch will be highlighted. For example
on the Edit Page, Switches toggle between SAMPLE Mode and SYNTH Mode, toggle
LFO Sync on and off, or select between Velocity Curve settings. Power Buttons
are also a type of Switch, an example being the FILTERS On/Off Button.
Mode Switches (flat buttons that are side-by-side are Mode Switches)

Switches (flat buttons which are separated are On/Off
Switches)


Power Switches


CONCEPTS - Indicator Switches
CONCEPTS - Indicator Switches

Indicator Switches are
both a status indicator and a toggle. A good example of an Indicator Switch is
found on the Edit Page, below each of the Oscillator sub-page Buttons; MAIN,
FM, RING, WS & MULT. These indicate whether the feature is enabled or not,
and double as a toggle to enable/disable them.
CONCEPTS - Key Modifiers
CONCEPTS - Key Modifiers
There are a number of
Omnisphere functions that are modified by combining a mouse-click (or click and
drag) with one of three Key Modifiers; the Command/Control key, Shift key, or
the Option/Alt key. In the manual these are referred to as:
Control-Click (Mac users, use Command-click)
Sliders & Knobs: resets the slider or knob to a neutral
or default position.
Browsers: allows selection of multiple Attributes.
Envelopes (editing): Control-click and drag to engage the
Lock function.
Shift-Click
Sliders & Knobs: Shift-click and drag allows finer and
more precise adjustments to values.
Envelopes (editing): Shift-click and drag to engage the Zoom
X/Y function
Option-Click (PC users, use Alt-click)
Envelopes (editing): Option-click to engage the Snap function.
Knobs: Option-click on a parameter to display its value without changing it.
NOTE:
Omnisphere defaults to linear mode. Your host may determine a different default
mode, but you can still temporarily switch to the alternate mode by using
Option-click.
CONCEPTS – Parameter Control
CONCEPTS – Parameter Control
Understanding Parameter Control
There
are three ways to control parameters in Omnisphere: Modulation, MIDI Learn and
Automation.
Deciding
which type of Parameter Control to use depends on a number of factors including
which host you use, which parameters you want to automate and what type of
physical controller (if any) you wish to use to control the parameters. Here
are some guidelines:
Modulation
Modulation offers the most sophisticated method of controlling
Omnisphere’s parameters. This method allows scaling, can use almost any MIDI
Message (Wheel, Pitch Bend, Aftertouch, Notes, etc.), and is saved/recalled
with each Patch.
To learn more about Modulation, please refer to the Modulation section.
Automation
With Automation messages, changes made to parameters using
the mouse can be recorded in the host software. Parameter adjustments are
typically written to an automation track, and in some hosts, you can draw the
automation curves directly into the track. This method is most useful for
mixing and fine tuning parameter changes over time on an existing performance
in your host.
To learn more about Automation, please refer to the Automation section.
MIDI Learn
MIDI Learn enables full remote control of Omnisphere’s
parameters from MIDI Devices. Almost any parameter in Omnisphere can be MIDI
Learned. MIDI Learn assignments are saved with the Multi or with your project.
This method is ideal for live performance or recording MIDI-controlled changes
into your host on the fly. Parameter adjustments using MIDI Learn are typically
written to a MIDI Track in the host software. MIDI Learn assignments for the
plug-in can also be separately saved and loaded as template presets.
Right/Control-clicking
a parameter in Omnisphere opens a contextual menu that offers options for all
three methods of Automation: Modulation, MIDI Learn and Host Automation.
Host
Automation and MIDI Learn give you the ability to control almost any of the
parameters of Omnisphere and to record and edit any adjustments in your
host.
To learn more about MIDI Learn, please refer to the MIDI Learn section.
NOTE: After setting up all of your MIDI Learn and Host Automation assignments, you can save a Default Multi, which will load all of your custom assignments each time you open a new instance of Omnisphere.
CONCEPTS – Host Automation
CONCEPTS – Host Automation
All MIDI Learnable parameters in Omnisphere can also be automated using the Host Automation feature. Each host handles Host Automation differently, so it’s important to understand how your specific software will interact with Omnisphere.
Enabling Host Automation
To make a Host Automation assignment for a parameter in Omnisphere, Right/Control-click a parameter to open its contextual menu, and then select the Enable Host Automation option.

The parameter will be assigned the next available Host Automation ID number, from lowest to highest. Once assigned, changes made to the parameter using the Omnisphere interface can be recorded in real time in the host software.
NOTE: If your host doesn’t display Host Automation assignments by name, use the Show Current Assignmants to display the parameter names along with their corresponding Host Automation ID numbers.
All Host Automation assignments are stored with the Multi, saved with the host project file, and can also be saved with a MIDI Learn Template.
NOTE: You can enable up to 256 Host Automation parameters. If you need more than 256 assignments, consider using MIDI Learn together with Host Automation.
Technical Considerations
There are 256 parameter slots in Omnisphere that can be automated, numbered from 0 to 256. These slots correspond to the list of parameters that can be automated in the host or on your control surface. For example, slot 0 is the first parameter in the host or on the control surface, the next one is number 1, etc. You can assign any parameter in Omnisphere to one of these slots using "Enable Host Automation". The parameter will be assigned to the next available slot and may then be automated from the host or control surface. Automation ID numbers correspond to the ordered list of parameters that can be automated in the host or on a control surface.
Parameter automation is capable of two-way communication. If your host and control surface support it, your control surface can display the names of the parameters controlled by each knob or fader, and each control can automatically update to show the current value of a parameter. For example, Mackie Control displays and automatically updates parameter names in real time. Motorized faders can move to show the current values of parameters, which is very useful when opening songs that contain plug-ins controlled by the surface.
Some hosts have a limit on the number of parameters that are available to be Host Automated. For example, some only permit the first 128 parameters of a plug-in to be automated. In others, the limit is 1024 parameters. By comparison, Omnisphere has nearly 20,000 parameters!
If you're working in a host that limits the number of automation parameters, you can also use the MIDI Learn feature of Omnisphere to automate Omnisphere's parameters. The combination of Host Automation and MIDI Learn gives you powerful real-time control of virtually every parameter of Omnisphere.
Host-Specific Notes
• Ableton Live - After Enabling Host Automation for a specific
parameter, it is necessary to also move that parameter in the Omnisphere
interface to complete the assignment.
• Logic - After setting up all of your MIDI
Learn and Host Automation assignments, you can save a Default Multi, which
will load all of your custom assignments each time you open a new instance
of Omnisphere. Logic Users will see all learned Host Automation parameters
by name upon load.
CONCEPTS – MIDI Learn
CONCEPTS – MIDI Learn
MIDI Learn is an immensely powerful feature that
allows you to remote control virtually any on-screen parameter with a MIDI
controller. It is a very flexible system that can adapt to the MIDI
device you use and allows changes made to any learned parameter to be recorded
by the host application.
While Host Automation
support varies widely among hosts, almost all hosts have the ability to record
and edit MIDI messages received from a MIDI controller.
The basic process of pairing a physical control
to an Omnisphere parameter using MIDI Learn is extremely simple:
- Right/Control-click
an Omnisphere parameter.
- Select MIDI CC
Learn (or MIDI Note Learn) from the contextual menu.
- Move a physical
control (or play a note) on the MIDI device that is connected to Omnisphere.
The Omnisphere parameter
will be instantly paired, and can then be controlled using that physical
control. All MIDI Learn assignments are stored with the MULTI, saved with the
host project file, and can also be saved as a MIDI Learn Template.
Key MIDI Learn Concepts
There are a few key MIDI Learn concepts that will
help to understand how flexible the system is:
- All Learnable
parameters can be controlled using MIDI Learn, and are also available for use
with Host Automation.
- A single physical
control can be paired with multiple parameters in Omnisphere. For example, a
single physical knob could be setup to control both Cutoff and Resonance.
- A single parameter
in Omnisphere can be controlled by multiple physical controls. One useful way
to use this is to create sub-mixes using the Mixer. You can ‘gang’ different
groups of Part levels in the Mixer, each controlled by a single physical fader.
For example, Parts 1 ~ 4 controlled by one fader, and Parts 3 ~ 6 controlled by
a second fader. In this example, two different physical faders would control
Parts 3 & 4.
- A MIDI device
sending on any MIDI channel can control MIDI Learned parameters on any of
Omnisphere's Parts/MIDI Channels. This means that you can use a MIDI device
with all of its controls assigned to a single channel, but still control any
parameter on any of Omnisphere eight parts.
- Assignments can be
made to receive in “Omni mode” so that when a sequencer's track is changed, all
of the controls are still active regardless of the incoming MIDI channel
assignment.
- MIDI Control
Change, Notes and Program Change messages are supported, but Pitch Bend and
Aftertouch messages are not currently supported in the MIDI Learn system.
CONCEPTS - MIDI Learn (Utility Menu)
CONCEPTS - MIDI Learn Menus
Utility Menu
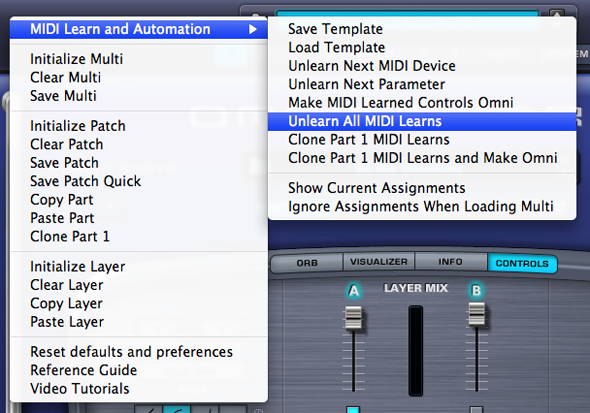
The Utility Menu provides MIDI Learn options that affect the entire plug-in. These include MIDI Learn Templates, Unlearn All, and the MIDI Learn & Automation Report (Show Current Assignments). The Utility Menu is opened from the Header, or by Right/Control-clicking any empty area of the Omnisphere interface.
MIDI Learn Template
All MIDI Learn & Automation assignments are saved with a MULTI, but there are times when it makes sense to save a MIDI Learn & Automation configuration for use with another project or environment.
MIDI Learn & Automation Templates allow custom setups to be saved and easily recalled whenever they’re needed.
Select ‘Save Template’ from the MIDI Learn & Automation sub-menu, to store all current MIDI Learn & Automation assignments for later recall. Selecting this option will open a File Save dialogue, allowing the Template to be named and saved.
Select ‘Load MIDI Learn Template’ to load a previously saved Template. Any existing MIDI Learn assignments will be replaced with the assignments stored in the Template. Selecting this option will open a File Load dialogue, allowing a saved Template to be loaded.
NOTE: Before saving a MIDI Learn Template, you can use MIDI Learn Report (see below) to preview the assignments that will be saved with the Template. This is also a convenient way to verify assignments after a MIDI Learn Template has been loaded.
TIP: If you own a Korg nanoKontrol, be sure to check out the MIDI Learn Template we have provided for controlling Trilian with your nanoKontrol! Inside the STEAM folder, browse to the Settings Library/Presets/MIDI Learn folder. There you will find the templates and instructions for how to set it up.
Unlearn Next MIDI Device
When a physical controller has been MIDI Learned, you can use this option to Unlearn it. To accomplish this, select Unlearn Next MIDI Device from the menu, then move the physical controller on your MIDI Device.
Using MIDI Learn, a single controller can have more than one parameter assigned to it. This option is especially convenient if you are controlling more than one parameter with a single physical controller. It allows you to clear all assignments for the specific controller, without having to Unlearn each parameter individually.
Unlearn Next Parameter
When a parameter in the Omnisphere interface has been MIDI Learned, you can use this option to Unlearn it. To accomplish this, select Unlearn Next Parameter from the menu, then select and move the parameter that you wish to Unlearn.
This is a useful feature when you have more than one parameter assigned to a single physical controller. A single parameter can be Unlearned, while the rest will remain assigned to the physical controller.
Make Controls Omni
Assignments can be made to receive in MIDI Omni mode so that when a sequencer’s track is changed, all of the controls are still active regardless of the incoming MIDI channel assignment.
Omnisphere is MIDI input channel sensitive when MIDI Learning. This means that it can distinguish between a button transmitting Ch 1 and the same button transmitting Ch 2.
Selecting this option allows all non-cloned MIDI Learn settings to respond to any incoming MIDI channel (e.g. MIDI Omni mode reception). This is very useful when you want Omnisphere to respond to an external control regardless of the current incoming MIDI channel.
Unlearn All
Selecting this option will clear all existing MIDI Learn and Automation assignments.
Clone Part 1 MIDI Learns
Use this option to clone all non-omni Part 1 MIDI Learn assignments to all other Parts in the Multi, and across all other MIDI channels.
Clone Part 1 MIDI Learns & Make Omni
This option clones all non-omni Part 1 MIDI Learn assignments to all other Parts in the Multi across all other MIDI channels and makes them Omni. Use this option when you want your assignments to track the part selections made in Live Mode.
Show Current Assignments
Show Current Assignments displays all existing MIDI Learn & Automation assignments as a formatted report. The information will be displayed using your default Web Browser.
This is especially useful for checking existing MIDI Learn & Automation assignments before saving a MULTI or a MIDI Learn & Automation Template, or to verify assignments after loading a MIDI Learn & Automation Template.
MIDI Learn Report
The
MIDI Learn Report displays all existing MIDI Learn assignments, and includes
Host Automation assignments. The Report will be displayed using your default
Web Browser.
The
MIDI Learn Report is especially useful for checking existing MIDI Learn
assignments before saving a MULTI or a MIDI Learn Template, or to verify
assignments after loading a MIDI Learn Template.
NOTE: If your host doesn’t display Host Automation assignments by name, use Show Current Assignments to display the parameter names along with their corresponding Host Automation ID numbers.
Ignore Assignments When Loading Multi (Toggle)
When loading a MULTI, this option determines whether Omnisphere will ignore or load the MIDI Learn assignments that were saved with the MULTI.
When the Ignore Assignments option is enabled (indicated by a checkmark displayed next to it in the menu), Omnisphere will ignore any MIDI Learn assignments that were saved with the MULTI. Instead, all existing assignments will be retained.
When the Ignore Assignments option is disabled (no checkmark next to it in the menu), Omnisphere will replace all existing assignments with the MIDI Learn assignments that were saved with the MULTI.
NOTE: The Ignore Assignments option retains its setting across sessions. If you find that MIDI Learn assignments aren’t behaving as expected after loading a MULTI, please verify that the Ignore Assignments option is properly set.
CONTEXTUAL MENU
Contextual Menus provide parameter-specific MIDI Learn options, and include Modulation and Host Automation options as well.
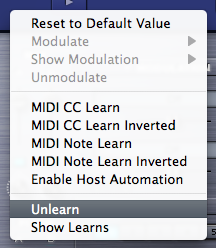
If a parameter can be MIDI Learned, the following MIDI Learn options will be available when you Right/Control-click directly on the parameter:
MIDI CC Learn
Select this option, then move or press a control on your MIDI controller. The control will then be paired with the Omnisphere parameter.
MIDI CC Learn Inverted
When you select this option, then move or press a control on your MIDI controller, the control will be paired with the Omnisphere parameter. However, the values will be inverted. For example, as you increase the value of the physical control, the value of the Omnisphere parameter will decrease.
MIDI Note Learn
Select this option then play a note on your MIDI controller. That Note will then control the assigned Omnisphere parameter. Once a Note has been MIDI Learned it will no longer trigger a sound when Omnisphere receives Note On messages from that Note, it will only control the assigned parameter.
MIDI Note Learn Inverted
When you select this option, then play a note on your MIDI controller, that Note will then control the assigned Omnisphere parameter. However, the values will be inverted. Once a Note has been MIDI Learned it will no longer trigger a sound when Omnisphere receives Note On messages from that Note, it will only control the assigned parameter.
NOTE: When you MIDI Learn a variable range parameter (such as a knob or slider) using MIDI Note Learn, the Note On/Off messages will toggle the parameter to its maximum and minimum positions respectively. When using MIDI Note Learn Inverted, the values are reversed, so Note On would toggle to the minimum value, Note Off would toggle to the maximum value.
Unlearn
Select this option to clear all MIDI Learn assignments, including Host Automation assignments, for this parameter.
Show Learns
Use this option to show all MIDI Learn assignments for this parameter. A pop-up dialogue will open showing all CC and/or Note numbers assigned, or will notify you if there are no current assignments.
CONCEPTS - CPU Optimization & Conservation
CONCEPTS - CPU Optimization & Conservation
One of the most difficult questions to answer is how much CPU power Omnisphere uses. The reason it's so difficult to answer is because STEAM™ was designed as a very flexible and open system, which allows you to freely add FX and more editing power based on the needs of what you want to create. This means that Omnisphere is capable of using all available CPU power and then some!
It's to be expected that the average patch in Omnisphere uses more CPU than the average patch in most other synths. That's for the simple reason that the average patch in Omnisphere has more things going on than the average patch in most other synths. Simple bread and butter sounds have been done...we're aiming for something beyond that with Omnisphere. However, we are always striving to improve CPU performance and hope to further improve performance in future updates.
There are a large number of features that you can enable in Omnisphere, and if you turn enough of them on you'll eventually overload any CPU. The point at which that happens depends on a lot of things: the number of Omnisphere parts in use, the number of plugins in use, the CPU power, etc. As a result it's impossible to predict what represents a reasonable number of enabled features for every given situation. If you are running into performance issues, it's best to turn off unnecessary features. Here's a summary of example things to try:
• Turn down polyphony.
• Turn down amplitude envelope release.
• Look for effects that can be turned off.
• Look for oscillator section features that can be turned off.
• In the case of Unison, try turning down the depth.
• Metal Pipe and AllPass filter types use more CPU than other filter types.
• Use one filter instead of 2.
• Glitching in the absence of a CPU overload might indicate a streaming underrun. If that's the case, try turning up the Pre-load memory size.
As you can see, there are several ways to help conserve CPU power in Omnisphere. The following detailed tips and techniques are especially useful in busy sessions when trying to make the most of your computer’s resources.
64-bit Instruments & Hosts
If you are using a 64-bit host (such as Logic 9.1), it can access all available system memory without the usual 3Gb limit. This means that you are less likely to run out of memory when loading very large instruments, or a large number of instances. If you find yourself running low on memory, you should add as much physical RAM as possible to get the most from your 64-bit software.
All Spectrasonics instruments are 64-bit, on both Mac and PC.
Sample File Server (Mac only)
For Macs running 32-bit host software, the Sample File Server allows you to load large sounds into physical RAM, bypassing the usual 32-bit System Memory limit. It is recommended to have a minimum of 6Gb of RAM installed when using the Sample File Server.
Windows users should use 64-bit host software.
NOTE: If you are running a 64-bit host (such as Logic 9.1), the Sample File Server is unnecessary, and you may get better performance with it disabled.
Sample Thinning
Sample Thinning allows Soundsources, Patches, and Multis to be loaded with fewer samples when selected, so that less system memory is used. This is especially important when loading large Trilian sounds into Omnisphere, using Omnisphere Library Integration.
Omnisphere provides Thinning options from the System Page, the Edit Page (Soundsource Zoom Edit View), and from the Patch & Multi Browsers
There are four types of Sample Thinning available; Round Robin samples, Legato samples, Velocities, and Pitch Thinning.
When loading larger sounds, such as Trilian sounds inside Omnisphere, using Thinning can make a huge difference in overall system memory demand, and these can be used in combination to balance between the best sound possible, and the conservation of resources.
Host Buffer Size
Performance and CPU load with all virtual instrument plug-ins are sensitive to the host's audio buffer size - particularly with an instrument as powerful as Omnisphere. If you experience performance issues with Omnisphere such as audio drop-outs, you can gain further Performance headroom by raising your host's audio buffer setting. A setting of 256 is usually a good compromise between good performance and acceptable latency, but you may wish to increase the buffer size if you need more CPU power. Omnisphere will also work with larger buffer sizes, so you can try adjusting this setting in your host.
Host Sample Rate
Omnisphere has been designed for optimal playback at 44.1k or 48k sample rate. If a host's project sample rate is higher than this, (88.2k, 96k, 192k, etc) it can have a significant impact on reducing Omnisphere's performance, without any real sonic benefit to Omnisphere. In fact, certain patches may not sound correct at higher sample rates. So we recommend keeping your host's sample rate at 44.1KHz or 48KHz for the optimal experience with Omnisphere.
Multi-Instance vs Multi-timbral
On single and dual-core systems, it's best to load multiple Parts (on different MIDI channels) within a single instance of Omnisphere, before opening any additional instances of the intrument. This is the best way to utilize the available CPU power for Omnisphere.
However, if a multi-core system is used, it can be beneficial to open multiple instances of Omnisphere to distribute the processor load between the cores. The resource handling is done by the host, so in this case it's useful to open more than one instance of Omnisphere. So the most efficient use on a multicore machine is to use a couple of instances multitimbrally - if assigning all Parts to a single instance is using up all the resources of a single core. Consult your host's documentation to make sure that it has support for multi-core/multi-processor systems.
Limiting Voices

Omnisphere allows up to
64 voices of polyphony per Part. This can put tremendous demand on the CPU, so
limiting polyphony is one of the most important things you can do to manage CPU
usage.
As a general principle,
set the voice count according to the type of Patch you are working with. For
example, Texture or SFX Patches typically don’t need 16 or even 8 voices of
polyphony. Anytime you are running low on CPU power, this is the first area to
look at for conserving CPU.
To adjust polyphony for
a Part, use the VOICES stepper on either the Main or Edit Pages.
Voice Multipliers
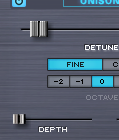
When using Granularity and
Unison, the Depth sliders control the number of simultaneous voices that are
playing, and so can have a big impact on CPU usage. You can often achieve the
desired effect using a lower Depth setting.
Oscillator Sub-Pages (FM, RING, WS, MULT)

It’s easy (and fun!) to
use all of the oscillator sub-pages at the same time, but used together these
can demand a significant amount of CPU power. Using them sparingly will often
lead to better sonic results and be easier on the CPU load.
Single Layer vs Dual Layer Patches

There’s a lot that can
be done with a single Layer. If you can achieve the desired sound or complexity
using one Layer instead of two, it’s likely that a significant amount of CPU
power can be conserved.
Common FX vs Layer FX

Using Common FX whenever
possible is a great way to save CPU power. Instead of loading separate delay
units into each Layer FX Rack, try sharing a single unit in the Common FX Rack.
Waveshaper

The Waveshaper is a
great feature, but it can be very CPU intensive, because it is polyphonic. To
save CPU, you can try alternate approaches to achieving the desired sound. For
example, try experimenting with the Flame Distortion unit first. You could get
similar results without putting as much demand on the CPU.
FM/Ring Mod

Both FM and Ring Mod
have dedicated oscillators, thus using additional CPU power. Combining these
with additional oscillator features like Waveshaping or Unison can add a lot of
required processing.
Unused Modulation Routings

Modulation routings
sometimes use CPU power, so be sure to remove any unused routings. For example
if you are modulating FM Depth with a Mod Envelope, but then decide to turn FM
off, remove the modulation routing to further reduce demand on the CPU.
Bypass Unused FX
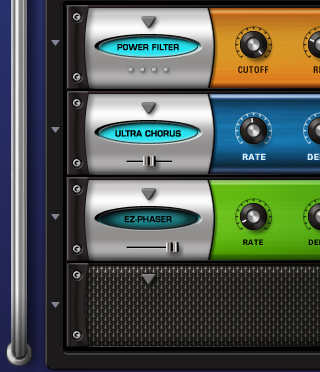
When Bypassed, FX Units
do not consume CPU power. To conserve CPU power, Bypass any loaded FX when they
are not in use. This especially applies to Aux Send FX, since the entire Aux Send
system is enabled even if you are only using one Send.
EZ-Verb vs. PRO-Verb
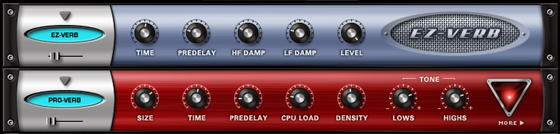
EZ-Verb doesn't
necessarily use less CPU power than PRO-Verb. PRO-Verb has a variable CPU Power
parameter, where EZ-Verb's CPU Power is fixed. This parameter changes the number
of reflections in the reverb signal, and a higher setting is not always a
“better” sound -but more reflections require a higher amount of power to
achieve. Sometimes lower CPU settings will produce a more desirable result. If
PRO-verb is set to maximum CPU, it takes much more power than EZ-Verb - while
lower PRO Verb CPU settings (like the default settings) can actually require less power than EZ-Verb.
Sharing FX with Aux Racks

When using FX like
reverbs, it's often better to use the reverb on an Aux Rack, instead of as an
Insert. There are times when several sounds need reverb, and instead of
inserting 6 reverbs into 6 individual Parts, you could instead place only one
reverb on an Aux Rack and then use the Aux Sends to send all six sounds to the
single reverb unit. This is far more efficient on the CPU.
Aux Sends
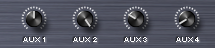
If you are not using the
AUX Sends on the Mixer Page, make sure all of them are off (all knobs turned
fully counter-clockwise). When all of the Aux Sends are off, the entire AUX
system is disabled, which saves CPU power. If any of the Aux Sends is on,
the entire Aux Send system on all Racks and Parts is enabled, even if no audio
is passing through it.
CONCEPTS - Remote Control
CONCEPTS - Remote Control
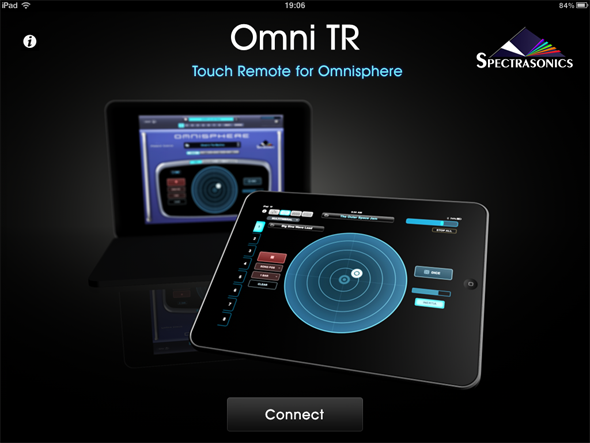
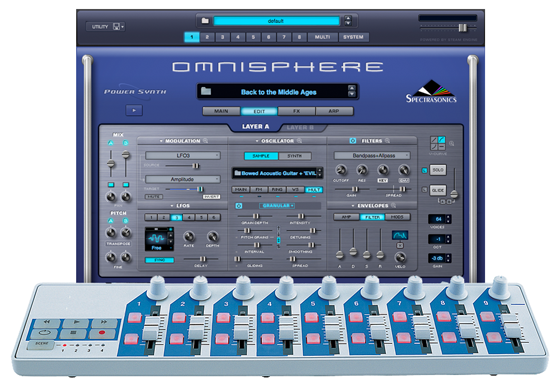
Spectrasonics has developed an application for Apple’s iPad which turns it into a performance-oriented, remote control surface for Omnisphere: Omni TR.
CONCEPTS - Omni TR
CONCEPTS - Omni TR
Omni TR (Touch Remote) is designed to turn an iPad into a performance-oriented, remote control surface for Omnisphere, running on a Mac or Windows PC. Omni TR offers wireless two-way communication, multi-touch patch selection, remote browsing and editing of Patches and Multis, and the ability remotely control the Orb.
Omni TR is a four-page app. The pages can be accessed by selecting the icons on the top-left.

Main
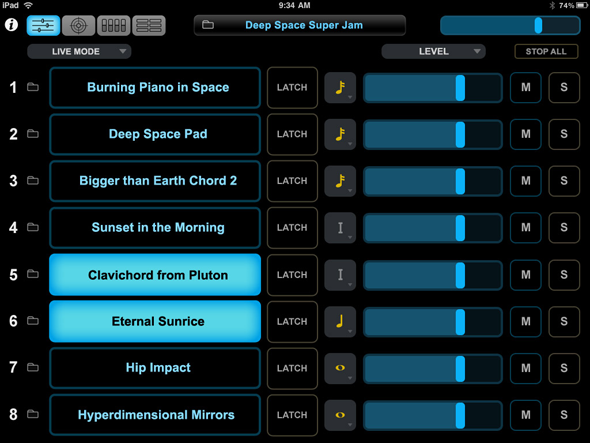
The Main page is designed to give a rapid overview of all 8 parts in Omnisphere. Touch the folder icons to the left of the patch names to select Patches or touch the folder to the left of the "Browse Multis" display to select Multis. The folder menus will reflect what is currently displayed in the respective browser in Omnisphere. Control the mix with the level sliders and the mute/solo buttons on the right side. The top right slider on each page is the Master Volume slider. If you have Omnisphere in "Live Mode", you can select which part to play by touching the patch name, and it's easy to select multiple parts simultaneously. Each Part can be latched individually and you can set the Trigger Mode from the buttons directly to the left of the sliders.
Orb
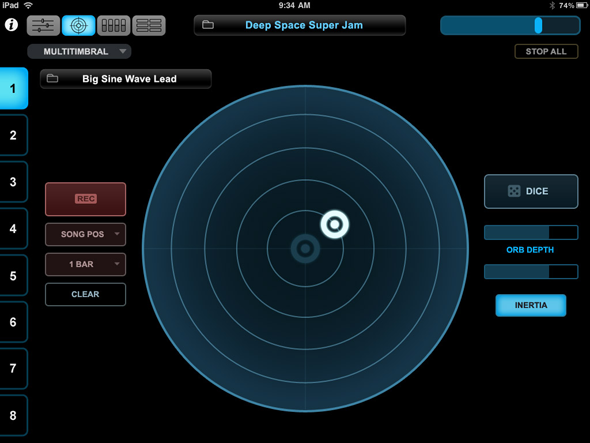
The Orb is a unique circular controller that intelligently modifies Omnisphere sounds in realtime. To create diverse new modifications to your Patches, simply touch the Orb and move your finger. The DICE button will give many interesting variations on the parameters being controlled. Change the Inertia amount to control the speed and duration of the controller after you set it in motion and let go. Use the Depth Slider to control the intensity of the effect. You can also capture movements with the Record button and the movements will become part of the Patch when it is saved.
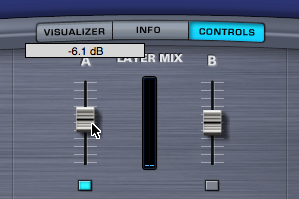
Controls
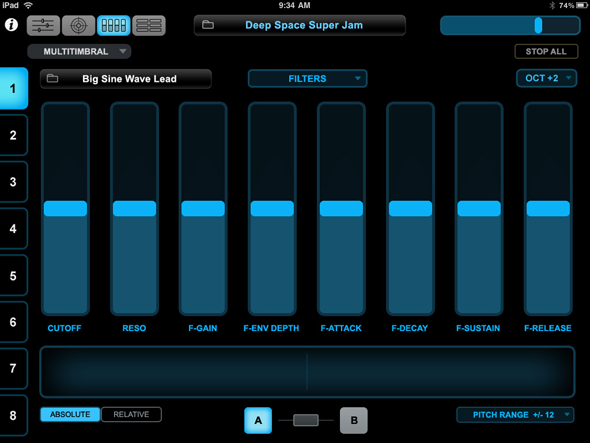
The Controls page offers fast access to some of the most useful performance parameters in Omnisphere and a fun Pitch Ribbon. Select the desired Part from the tabs on the left. Choose from the control templates in the drop-down menu above the faders to change which Omnisphere parameters are displayed. The A/B/Link buttons at the bottom of the page work the same as on Omnisphere's EDIT page, determining which layer's parameters are displayed/edited. Bend the pitch from the Pitch Ribbon Controller along the bottom. Use the Octave Shift Menu in the upper-right to shift the keyboard range
Jumbo
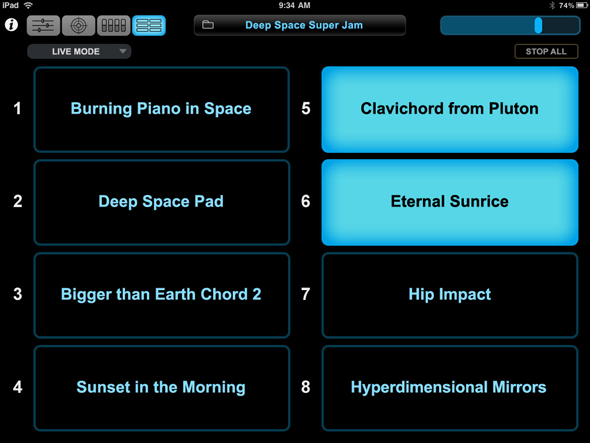
Sometimes on stage it can be useful to have large, easy-to-read Patch selection buttons. Just like on the Main page, you can select any combination of Patches on the fly and it's easy to see the patch names. Make sure "Live Mode" is selected from the drop down menu in the top left area.
Setup
Setup is very simple. With Omnisphere running on the computer and the iPad connected to the same wireless network, launch the Omni TR app on the iPad and press "Connect." Omni TR will recognize the host computer and allow wireless, touchscreen control of Omnisphere.
Requirements
The Omni TR iPad app requires iOS 4.2 and works with Omnisphere 1.5 or newer on Mac OSX or Windows systems. Windows users must install Bonjour from Apple.
For complete instructions, please visit our website at: http://www.spectrasonics.net/omni_tr_app/