MAIN - Introduction
This area contains the ORB page, the VISUALIZER, and the INFO and CONTROLS pages. Omnisphere defaults to the CONTROLS page and is an excellent starting point for all users.
MAIN - Introduction
This area contains the ORB page, the VISUALIZER, and the INFO and CONTROLS pages. Omnisphere defaults to the CONTROLS page and is an excellent starting point for all users.
MAIN - The Orb
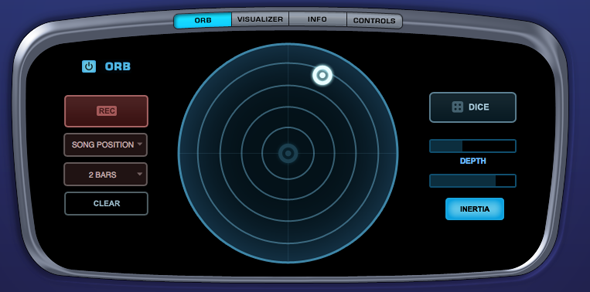
The innovative Orb feature is both a remarkable sound manipulation tool and an intuitive performance interface — it can be thought of as a ‘circular controller.’ With a single click of the mouse, it is possible to instantly manipulate a sound in many different ways. Best of all, the Orb automatically works with every patch a user has, there’s no setup necessary.
The Orb is a fun and intuitive way of introducing movement and animation into the sound by simply moving the Orb cursor with a mouse, a MIDI controller or in the case of an iPad, with fingers directly on the Orb itself. As the Orb moves around the concentric circles, it morphs between automatically generated parameter scenes in Omnisphere’s STEAM engine in a highly intelligent and musical manner — all patch dependent — manipulating the sound in subtle or radical ways appropriate to that particular patch.
The Orb's unique dynamic results are based on Radius and Angle controls. The Angle defines which scenes or sets of parameters it manipulates, and the Radius defines the intensity of those manipulations. That means the closer to the edges of the circle the cursor is moved, the more dramatic the changes will be. Moving the cursor to the center of the Orb or pressing the CLEAR button returns to the sound of the original Patch. The overall intensity of the sound modifications can be determined with the DEPTH slider.
If you don't like what the Orb has created, a complete new set of manipulations can be chosen by simply rolling the DICE button, which instantly creates a brand new group of intelligent sonic modifications and effects to try. There’s no limit to how many serendipitous sonic variations the DICE can create – opening up the vast power of the STEAM engine to every user, regardless of synthesis knowledge. For advanced synthesists seeking maximum flexibility, the Orb can also be setup manually and used as a new modulation source in Omnisphere’s Mod Matrix.
The INERTIA controls of the Orb allows the creation of a ‘movement trail’ after letting go of the Orb, just like a ball might roll and bounce off the walls of a circular enclosure, adding a musical symmetry to the “performance” of an Orb interaction. It is also possible to Record performance movements directly into the Orb and play the performance back in sync with the host. The Orb’s movements and sonic results are saved within the Patch, Multi or the host’s session for later recall. The movement of the Orb can also be automated in the host. Each part in Omnisphere has its own Orb, which means that multiple Orbs can manipulate different sounds simultaneously.
The ideal control surface for Omnisphere’s Orb is the multi-touch interface of the Omni TR iPad app, but the Orb can also be used with standard mice, trackpads and MIDI controllers.
ORB POWER SWITCH
![]()
This switch will turn the Orb on and off. Note that turning on the Orb will activate some processing modules and enable FX units in your Patch in order to ensure moving the cursor creates some interesting sounds. Turning the Orb off deactivates any processing modules and removes any FX that were instantiated when it was turned on.
MAIN - The Orb - Dice, Depth & Inertia

DICE

Pressing the DICE button will instantly create a brand new group of intelligent sonic modifications and effects to try. There’s no limit to how many serendipitous sonic variations the DICE can create – opening up the vast power of the STEAM engine to every user, regardless of synthesis knowledge. You will be presented with a different idea or point of departure each time you press it.
NOTE: It's important to save your Patches once you are satisfied with the Orb's changes. Once you press the DICE button or select a different Patch in that Part, Omnisphere will not be able to recall any previous Orb settings unless they have been saved with the Patch or with the host's session.
ORB DEPTH

The overall intensity of the Orb's sound-manipulation can be controlled with the DEPTH slider. The higher the DEPTH slider is set, the more pronounced the changes will be to the Patch.
INERTIA
![]()
INERTIA is the resistance of any physical object to a change in its state of motion or rest. When using the Orb with INERTIA enabled, it is possible to let go the cursor in any direction and just like a ball might roll and bounce off the walls of a circular enclosure, adding a musical symmetry to the “performance” of an Orb interaction. When INERTIA is not enabled, the cursor will stop when the mouse is released, providing the ability to jump from one stationary point to another for dramatic, instantaneous changes.
Inertia Switch
This turns the Inertia on or off.
Inertia Amount
The Inertia Amount controls the speed and duration of the cursor's movement after it is set in motion and let go. The higher the Inertia Amount slider is set, the faster and longer the cursor will bounce around. When turned all the way up, the cursor will continue to move indefinitely.
MAIN - The Orb - Recording
The Orb's movements, whether manual or INERTIA-based, can be captured with the Orb's built-in recorder. These movements can be saved as part of the Patch. This simple feature adds a dynamic quality to a sound that is unique and quite difficult to achieve with conventional controllers.
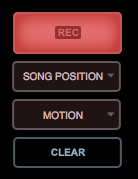
By using the RECORD button and the menus below it, the built-in recorder can be programmed to
capture a general idea of the movements (MOTION) or to record precise movements over 1, 2 or 4 bars, relative to your sequence. The recordings can be set to play back synced to LEGATO or SONG POSITION.
In all cases, the Orb creates a looping cycle by smoothly connecting the trajectory of the end with the beginning of the move, no matter how complex.
Recording Modes
The four Recording Modes are: MOTION, 1, 2 or 4 BARS.
MOTION
MOTION will capture the speed and trajectory of the Orb for a few seconds and then generate a full orbit cycle out of those movements. MOTION mode is not intended to record precise movements that need to be synced with the song and tempo of the host.
To initiate recording, press the red RECORD button. The recording will begin as soon as the the cursor moves. The RECORD button will turn to solid red for a few seconds and a non-decaying Orbit will be created based on the recording.
NOTE: If the cursor is not moving when the RECORD button is pressed, the RECORD button will flash, waiting for the cursor to move. Recording will begin as soon as any movement is detected.
1, 2 or 4 BARS
Choose 1, 2 or 4 BARS for recording precise movements in those lengths that you would like to be synced with the host.
To initiate recording, press the red RECORD button. With the cursor in motion, the RECORD button will flash while waiting for the beginning of the next bar, whether or not the host sequencer is playing (Omnisphere's internal clock continues to run when the host is not playing). At the beginning of the next bar, the RECORD button will turn to solid red and begin recording. After the selected number of bars are complete, the recording stops and a loop of the movement is created. The cursor's location at the end of the recording will be smoothly linked to the beginning to ensure there are no abrupt changes as the movement loops.
Note: If the cursor is not moving when the RECORD button is pressed, the RECORD button will flash and then start recording at the beginning of the next bar.
If you're not satisfied with the movement that was recorded, press the CLEAR button to start over.
MAIN - The Orb - Trigger Modes
![]()
There are two available Trigger Modes that determine whether the recorded movements are synchronized with the host sequencer or with your playing.
NOTE: It is important to set the Trigger Mode before recording, as it cannot be modified afterwards.
LEGATO
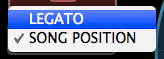
When set to LEGATO, the recorded movements will start their cycle when the first note of a legato phrase is played. As long as the notes played are connected, the recorded loop will continue uninterrupted. Once all notes are released, the recorded loop restarts with the next note that is played. Playing in a detached manner will cause the loop to restart with each note.
SONG POSITION

When set to SONG POSITION, the recording will track the bars and beats of the song and play back the movements accordingly. This setting is useful if you're moving the cursor around in sync with the beat and you want in to play back in the same rhythmic way, regardless of when a note is triggered.
MAIN - The Orb - Clear
![]()
Pressing the CLEAR button will restore the Patch to its original state. The Orb's cursor will be returned to the center and any movements recorded in the built-in recorder will be cleared.
NOTE: The CLEAR button does not affect which parameters are modified by the Orb. The same parameters that were modified before pressing it will still be modified afterwards when the cursor is moved.
MAIN - The Orb - Automation
The Orb's movements can be automated in your host sequencer.
Since the Orb's movements are plotted on 2 different X/Y-type planes, "Angle" and "Radius," they must be enabled independently.
To enable the Orb's host automation, follow these steps:
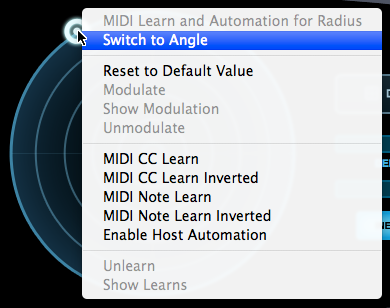
1. Right-click on the Orb and choose "Enable Host Automation" to enable the Angle (the default setting) for automation.
2. Right-click again on the Orb in Omnisphere and choose "Switch to Radius."
3. Right-click once more on the Orb and choose "Enable Host Automation" to set the Radius for automation.
4. Enable automation record in your host and hit play.
Any movements that occur in the Orb, either manual dragging or INERTIA-based, will now be recorded into the host's session. Play it back to hear a faithful reproduction of your Orb performance and use your host's automation editing features if you'd like to edit it.
MAIN - The Orb - MIDI Learn
The Orb's movements can be controlled using a MIDI controller.
Since the Orb's movements are plotted on 2 different X/Y-type planes, "Angle" and "Radius," they must be assigned to different MIDI CCs to work effectively.
To control the Orb using MIDI CCs, follow these steps:
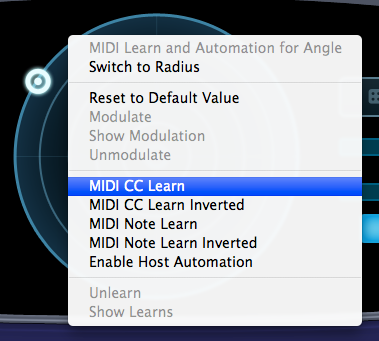
1. Right-click on the Orb and choose "MIDI CC Learn" to MIDI Learn the Orb's Angle (the default setting).
2. Move a physical control on the MIDI device that is connected to Omnisphere to control the Orb's Angle.
3. Right-click again on the Orb and choose "Switch to Radius" to MIDI Learn the Orb's Radius.
4. Move a different physical control on the MIDI device to control the Orb's Radius.
The Orb will be instantly paired, and can then be controlled from a MIDI Controller. All MIDI Learn assignments are stored with the MULTI, saved with the host project file, and can also be saved as a MIDI Learn Template.
NOTE: Inertia is a mouse/touch feature only and is incompatible with MIDI input. When the Orb is controlled using a MIDI Controller, the result will be the same as if Inertia was disabled.
MAIN - The Orb - Using The Orb As A Modulation Source
The Orb can be used as a modulation source. Using the DICE provides interesting and surprising results instantly, however using the Orb as a modulation source gives the user flexibility and full control over the parameters it modulates.
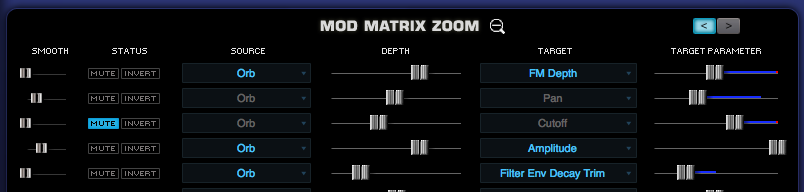
The Orb is seamlessly integrated to Omnisphere's Flex-Mod™ system. In Omnisphere, by right-clicking on the parameter to be modulated, the available modulation sources will appear under the "Modulate", "All Mod Sources" submenu. By selecting "Orb," the Orb will be automatically routed to the target parameter.

![]()
Please check the Modulation section for more information.
Orb as a modulation source vs the DICE button
The Orb can generate sound modifications automatically by using the DICE button, or manually by user-defined modulation routings. Each method has its pros and cons and they cannot be used simultaneously. When using the Orb as a Modulation source, keep in mind the following rules:
1. Creating a modulation routing where the Orb is the source overrides any sound modification that was automatically generated by it.
2. If you press the DICE button after using the Orb as a modulation source, the routings will be overridden. However, they will not be lost. In order to enable them again, simply reselect the Orb as a modulation source for any of them.
MAIN - Visualizer
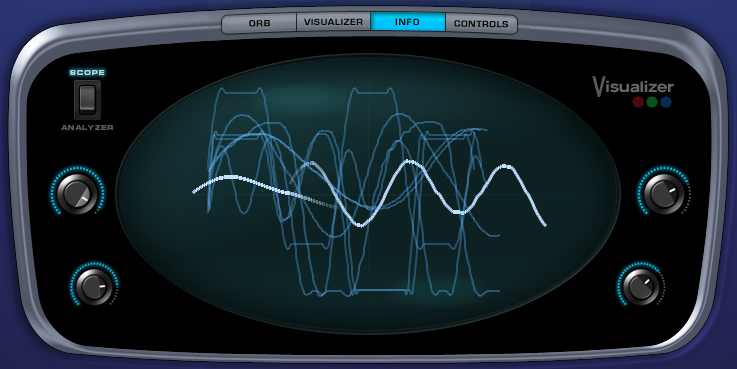
The VISUALIZER creates a dynamic graphic representation of the patch as it’s being played. Though not necessarily designed as a serious analysis tool, it’s fun to use and adds visual impact to the sound that is being played.
There are two types of VISUALIZER effects, SCOPE & ANALYZER that are chosen by a rocker switch in the upper right of the VISUALIZER display.
SCOPE is a waveform display, similar to an oscilloscope. The ANALYZER is based on a realtime spectrum analyzer, actively displaying the different frequencies in the current sound.
There are several control knobs that affect the VISUALIZER’S display. Depending if they controlling the SCOPE or ANALYZER, they will have different functions.
VISUALIZER SCOPE
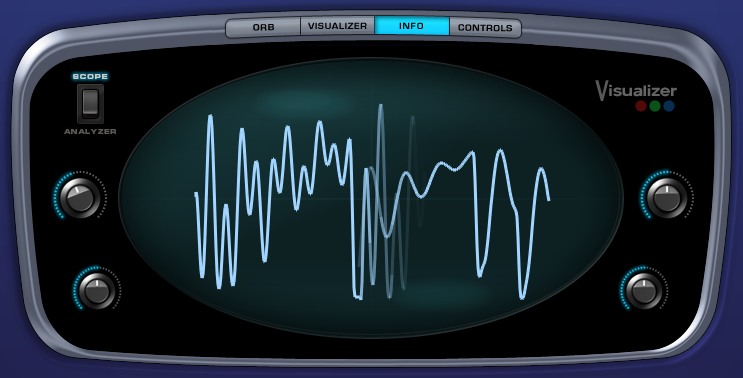
The Scope display is controlled by four parameter knobs, which are (counterclockwise)
Fade
Controls the visual feedback of the waveform display, the higher the setting the longer the waveforms fade out into the background.
NOTE: The Fade control will need to be set to a medium to high level for any significant movement will be seen.
Expand
This determines the height (Amplitude) of the waveform displayed. Lower settings will reduce the amplitude and higher settings will increase it.
Movement
Controls the visual decay of the waveform. The higher this parameter is set, the more the waveform will bounce around in the VISUALIZER’S window.
Layer XFade
This control will visually blend the waveforms coming from Layer A & Layer B. When set to minimum or maximum, only one of the Layer waveforms will be displayed. At 50%, half will be Layer A and half Layer B:
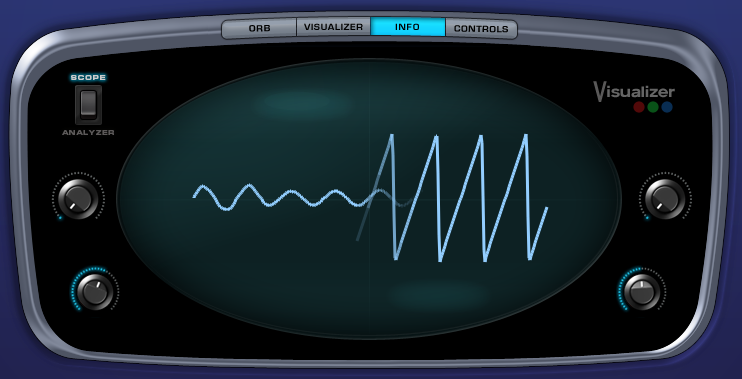
Layer XFade will only work if a Soundsource is enabled on both Layers.
VISUALIZER ANALYZER
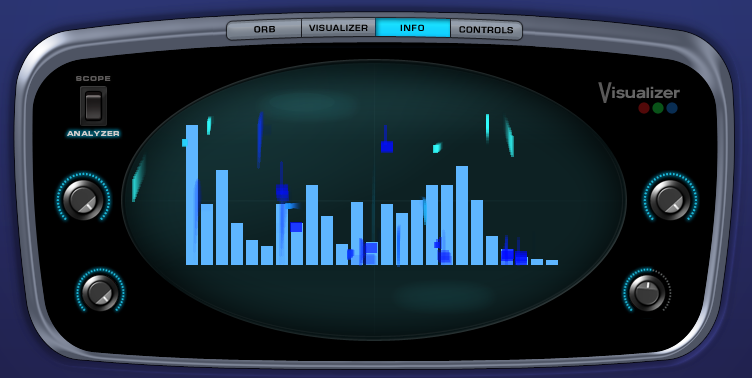
The Analyzer display is controlled by four parameter knobs, which are (counterclockwise)
Duration
When this control is increased, more graphic elements are added to the analyzer spectrum bars in the display.
Color
Raising the Color parameter will introduce a deeper blue color in the graphic elements that move above the spectrum display.
Horiz (Horizontal)
This controls how much horizontal movement the graphic elements will have above the spectrum display.
Damping
The damping control will determine how long the graphic elements will remain above the spectrum display. The higher the setting, the quicker the elements will drop to the bottom of the display.
MAIN - Info Page
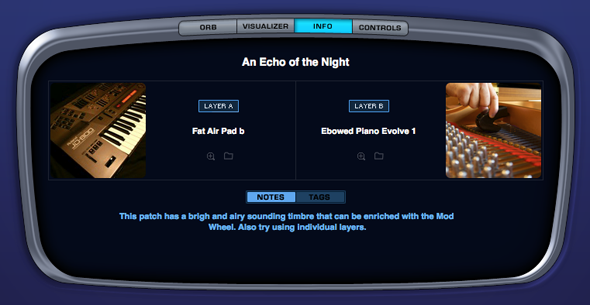
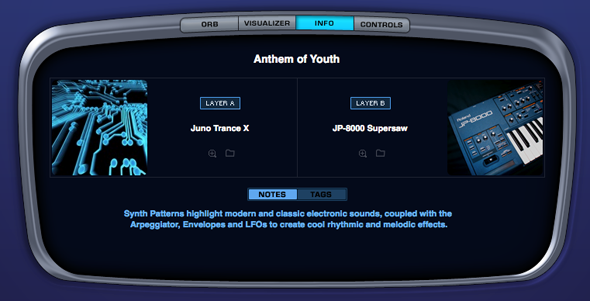
The MAIN INFO page provides visual characterization of the Soundsources that make up the patch and useful information about the Patch with Performance suggestions.
Layer A/Layer B AREAS
Each of Omnisphere’s two Layers has a Soundsource image area as well as the name of the Soundsources used in the Patch. The Layer A/B rectangles above the Soundsource names act as a Layer On/Off switches for quick auditioning.
Selecting the Soundsource Zoom icons will display information specific to the Soundsource on that Layer. This includes a larger Soundsource image. details about the origins of the Soundsource a web link and legal information links with more info about the Soundsource.
NOTES
The NOTES area contains a description of the patch, ideas for its application and other performance information that will be of interest. This can be simple comments, suggestions or ideas. It can provide more detailed information like educational or historical material, background data, programming information or other creative options.
TAGS
Attributes are one of Omnisphere’s most powerful features. Tags are attributes that can detail the physical characteristics, timbre quality and similar descriptions of the patch. These Attributes enable patch selections to be filtered via Omnisphere’s Browser. You can edit these Tags using the powerful “Edit Tags” feature of the Browser.
SOUNDSOURCE ZOOM

The Soundsource Zoom Icon opens the Soundsource Zoom Edit View. When the Soundsource Zoom is open, you can toggle between Edit View and Info View using the Edit and Info buttons on the Soundsource Zoom pane.
![]()
The Soundsource Zoom can also be opened from the Edit Page Soundsource Display, or from the Soundsource Browser Info Pane.
The Soundsource Zoom Edit View allows you to adjust various parameters specific to the Soundsource loaded in the selected Layer. For details please see the Soundsource Zoom Edit View chapter.
The Soundsource Zoom Info View provides detailed information about the Soundsource. To learn more, see the Soundsource Zoom Info View chapter.
Soundsource Name & Notes
Notes will include some information about the sampled sound, including as the origin of the sound and how it was modified or adapted for inclusion in Omnisphere. There also will be some suggestions for its use and some ideas for modifying it.
Soundsource Attributes
This section will cover a wide variety of data and Tags, including the author, specifications and categorization.
More Info + WWW
Additional information about most of Omnisphere’s Soundsources can be found on the Internet. A web link button will open a webpage with further information about the Soundsource and/or it’s author.
Legal Info
This button will open a page in your web browser that detail legal information about trademark and copyright issues regarding Omnisphere’s Core Library.
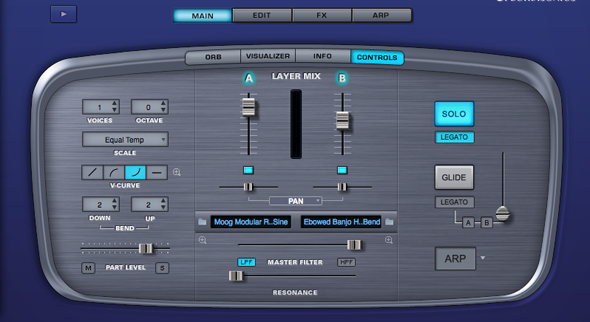
MAIN CONTROLS - Introduction
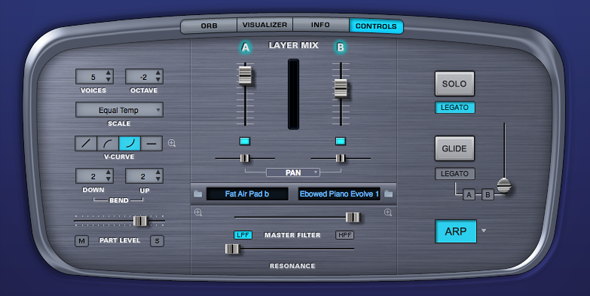
The MAIN CONTROLS page is the default page that Omnisphere opens to and can be considered the ‘dashboard of Omnisphere’. It allows quick changes to the Patch that’s been loaded, such as blending the Layers, Panning and Filtering. There are also useful performance controls that appear exclusively on this page.
The number of voices can be set, pitch and keyboard intonation and the bend ranges for the patch. Lastly there are controls for the Solo modes, Glide and enabling the Arpeggiator (Arpeggiator presets are available from the drop-down menu).
The Main Controls page is divided up into three sections. To the left and right are controls that affect the whole Part, and the center section has controls that are specific to each Layer.
Some parameters are unique to the Main Controls page, such as the MASTER FILTER, PITCH BEND and the SCALE options, for loading different types of tuning.
It includes multipurpose sliders for PAN, ATTACK and RELEASE, so different changes can easily be made from one place.
Below the Soundsource name displays for each Layer in the center, the Zoom icons reveal more information about those Soundsources.
MAIN CONTROLS - Voices
![]()
The VOICES parameter determines the number of simultaneous notes (also called polyphony) that are playable in a single Part. Omnisphere is capable of up to 64 voices of polyphony per part, and the VOICES selector determines the maximum number of voices that the Patch will have.
The higher the number of voices that the Patch has, the more CPU power it will use, so this is a very important parameter in Omnisphere. The best approach is to only set it to the maximum number of notes that are needed for the given musical application.
The factory Patches have all been set conservatively, so if more polyphony is needed, increase the number of voices.
Range 1-64
NOTE: Voices applies to all sounding notes, not just the ones that are currently being played. This is important to consider when playing sounds with longer release times
MAIN CONTROLS - Octave

This function raises or lowers the overall pitch by transposing the Patch in 12-semitone increments. There is a total range of five Octaves.
Range -2 to +2
MAIN CONTROLS - Scale

One of Omnisphere’s versatile features is its ability to utilize different tunings, which includes historical temperaments, microtonal scales and user-created temperaments as well. Omnisphere can import any .TUN scale file.
Each Part can have a single Scale active at one time. In a Multi up to eight different Scales can be loaded at the same time.
Each tuning lists the number of notes per octave. For example, if you select “Pelog 7-tone” the octave will repeat every eighth half-step.
NOTE: The common reference for all of the alternate tunings is that pitch of middle-C (C3 or C4 on your controller) will always be the same, no matter what Scale is loaded.
![]()
Some of the temperaments that are included with Omnisphere are:
Arabic
The first two Arabic scales were created in the first century by Persian philosopher Abu Nasr al-Farabi and are still used in modern Arabian music. Sabbagh tuning is designed for the Od (a lute-like instrument) and last is a common Turkish 24-note scale.
Al-Farabi 17-Tone
Al-Farabi 19-Tone
Sabbagh 7-Tone
Turkish 24-Tone
Gamelan
These scales are used in Indonesian gamelan music. A Gamelan is an ensemble comprised of metallic percussion, strings, horns and vocals. So these scales work very well with metallic, bell-like sounds.
Degung 5-tone
Jemblung 5-tone
Pelog 7-tone
Pelog and Slendro (Pelog on the white keys and Slendro on black)
Slendro 5-tone
Udan 12-tone
Historical
These are mostly octave-based scales, where were attempts to resolve the inherent ‘un-pure’ nature of the 12-tone scale, so some intervals and chords will sound very pure and others will be quite dissonant (the dissonant notes are sometimes called ‘wolf’ tones)
Kirnberger II – Named for Johann Kirnberger, who was a student of Bach.
Meantone Half – First created in the 15th century, and utilized by JS Bach, amongst others. It attempted to create purer thirds, by sacrificing the purity of the fifths.
Olympos 5-tone – an Ancient Greek pentatonic scale.
Pythagorean – Named for Pythagoras, based on perfect fifths and has been used since 3500BC. There are two 17-tone versions and a 12-tone Pythagorean scale as well.
Silbermann – Named for Gottfried Silbermann, an builder of keyboards in the 16th century.
Werkmeister – Named for Andreas Werkmeister who created it in the late 1600s.
Microtonal
These scales are stretched outside the standard 12-tone scale, and simply add additional microtonal steps from just under an octave up to 48 tones per octave.
11-Tone – One octave minus one half tone
13-Tone – One octave and a half tone
17-Tone – One octave and a major fourth
19-Tone – One octave and a major fifth
24-Tone – Two octaves
31-Tone – Two octaves and a fourth
48-Tone – Four octaves
Modern
These alternative scales were created within the last one hundred and fifty years.
Bohlen-Pierce – a 13-tone scale named for Heinz Bohlen and John Pierce
Carlos Scales - Synthesis pioneer Wendy Carlos created these five scales. The first three are microtonal and the remaining two are 12-tone scales.
Carlos Alpha 18-tone
Carlos Beta 22-tone
Carlos Gamma 35-tone
Carlos Harmonic C
Carlos Super Just C
Darreg Genus – A 9-Tone scale named for Ivor Darreg, who created the first re-tunable synthesizer in the 1950s.
Ellis – A 24-tone scale named for Alexander Ellis and Hermann von Helmholtz, a well-known scientist of the 1800s.
Partch 29-tone – Henry Partch, an American composer of the 20th century created many alternate tunings, such as 43-tone, 37-tone and this 29-tone scale.
Western
Equal Temperament - the default tuning for most of Western culture (and for Omnisphere as well).
MAIN CONTROLS - V-Curve
![]()
The “V” stands for Velocity. Omnisphere has four velocity curve presets available on the CONTROLS screen. The first curve is linear, then two exponential curves and the last is flat. These curves are provided to quickly adjust the dynamic response of the current Patch to your MIDI controller and playing style.
Linear
![]()
The linear curve is the most commonly used velocity setting. Playing harder on the keyboard will have a direct effect on any parameter that is modulated with velocity in an even and linear way.
Exponential Positive
![]()
The Exponential Positive curve means that when playing softly not much effect will be heard, but when playing at a moderate intensity on the keyboard the velocity modulation will be more dramatic than with a linear curve.
Exponential Negative
![]()
Exponential Negative has the opposite effect of Exponential positive – meaning that it’s better suited for more intense touch and provides the widest musical dynamic range.
Flat
![]()
Omnisphere will receive the same velocity value with this flat curve. Useful if a totally consistent and predictable result is desired.
V-CURVE ZOOM

The V-Curve Zoom button provides access to the Velocity Curve Zoom, for precise editing of the Patch’s Velocity response.
MAIN CONTROLS - Bend

Omnisphere has the ability to control the Pitch Bender’s range independently for both up and down movements (whereas many synthesizers only allow the same amount of bend in both directions). This setting is for the patch, and determines how much the note will bend when using the MIDI controller’s pitch bender.
DOWN
Determines how much the pitch will bend down using the MIDI controller’s pitch bender.
Range 0 to 24 semitones
UP
Determines how much the pitch will bend up using the MIDI controller’s pitch bender.
Range 0 to 24 semitones
MAIN CONTROLS - Part Level, Mute & Solo

This slider determines the overall volume of the selected Part. This slider, and the Mute/Solo switches are the same as the Mute/Solo and Part Level control on the Mixer page.
Range -Inf dB to +9.54dB
NOTE: The Part Level, MUTE and SOLO parameters are saved with the MULTI, not the Patch.

M (Mute) – Suppresses the audio of the Part.
S (Solo) – Isolates the audio of the Part, muting any other Parts that are active.
MAIN CONTROLS - Layer

LAYER MIX
These two independent faders control the mix or “blend” of the two Layers in the Part. Each fader’s range is from -inf dB (zero) to +9.54dB. Selecting the fader while holding down the Command key (Mac) or Control key (Windows) will automatically set the levels to 0dB.
Between the two controls is the “VU Meter” that displays the volume level of the left and right audio channels of the Part.
Range inf dB (zero) to +9.54dB
LAYER ON/OFF
![]()
Below each of the Layer Mix sliders are two on/off buttons that determine if a Layer is active or not. They also can be used to mute either layer to make comparisons without having to adjust the Layer Mix faders. If the button is light blue, the layer is active, if it’s gray, it’s inactive and no sound will be heard.
NOTE: If a Layer is active it uses CPU power. If a Layer is inactive, no CPU power is used.
MAIN CONTROLS - Pan, Attack & Release

Below the LAYER MIX sliders are two multi-purpose mini-sliders. This control defaults as a traditional PAN parameter, but ATTACK or RELEASE for each layer can be accessed as well by clicking within in the rectangle.
PAN
Each layer has an independent PAN controls. Selecting the slider while holding down the Command/Control key will snap it back to the center position.
ATTACK
The Attack parameter governs how quickly the sound starts, which means minimum settings will make the Attack fast and higher settings will slow the Attack down. Attack times range from instantaneous to almost two minutes long. This is a duplicate parameter of the AMP ENV Attack slider on the EDIT page.
Range 0.00 to 100 seconds
RELEASE
Release is how long the sound will decay after the note has been released. Minimum Release settings result in no sound after the note has been released. Maximum settings will add up to almost two minutes of Release time. This is a duplicate parameter of the AMP ENV Release slider on the EDIT page.
RELEASE Range 0.00 to 100 seconds
MAIN CONTROLS - Soundsource Name Display, Browser & Zoom

These menus display the names of both Soundsources or waveforms used in the Patch. Next to each Layer’s Soundsource waveform display is a Folder icon that opens Omnisphere’s Soundsource browser. From the Browser, thousands of new Soundsources can be selected, producing infinite variations for any Patch.
Below the Soundsource name is a Zoom icon, which opens the Soundsource Zoom view. This Zoom view contains information, pictures, web links and other details about the Soundsource.
If no Soundsource is displayed, then the layer is currently empty.
MAIN CONTROLS - Master Filter & Resonance
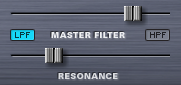
MASTER FILTER
![]()
Omnisphere’s MASTER FILTER is a filter for the whole Patch, meaning that it affects both Layer A and B. The MASTER FILTER has two available filter modes; LPF and HPF. The HPF (High Pass Filter) removes low frequencies from the sound. The LPF (Low Pass Filter) removes high frequencies from the sound.
The MASTER FILTER is completely separate from Omnisphere’s dedicated Filter section on the EDIT page. The MASTER FILTER is designed as a simple tone control. The extensive Filter section in the EDIT page should be used for serious sound shaping.
NOTE: Either LPF or HPF can be enabled at one time, but not both.
RESONANCE
![]()
The RESONANCE control affects the whole Patch, which means it will affect both Layer A & Layer B. RESONANCE, sometimes called ‘Q’, adds emphasis to the cutoff point of the MASTER FILTER. Because it works with the MASTER FILTER, it will not have any effect on the sound if the MASTER FILTER is set to minimum value.
At minimum settings, little to no emphasis will be heard. Moving the slider to the right will add more emphasis to the sound.
NOTE: The Master Filter is not capable of self-oscillation, but the Dual-Filter on the EDIT page is.
TIP: Try MIDI learning the Master FIlter to a MIDI Foot Controller. Having a simple “Tone Pedal” for live performance is extremely useful.
MAIN CONTROLS - Solo/Legato
SOLO

Solo allows the Patch to play monophonically. SOLO mode is most effective when playing lead or bass lines. It works in conjunction with the LEGATO button below it, which determines how the sound is triggered.
LEGATO
Legato is a triggering mode that allows the envelope and Soundsource to run through their settings instead of re-triggering with every new note that is played. If LEGATO is not selected, then each new note played will retrigger both the envelopes and the Soundsource.
NOTE: In vintage synths, Legato ‘ON’ would be referred to as “Single Trigger” while Legato ‘OFF’ would be “Multi Trigger”
MAIN CONTROLS - Glide

Glide is a portamento effect, which adds a pitch slide from one note to the next. Omnisphere’s Glide function is polyphonic, which means that every note that’s played will have a sliding pitch. Selecting the SOLO button above it enables monophonic Glide.
The control slider next to the GLIDE button determines how slowly or quickly that the pitches slide from one note to the next. The higher the control slider is set, the slower the pitch glide between notes.
Range 0 to 2 seconds
GLIDE LEGATO
![]()
Glide Legato will change the criteria for when GLIDE is enabled. If legato notes are played, then GLIDE will be activated. If quick, staccato notes are played, the Glide effect will not be heard.
GLIDE A B (LAYER BUTTONS)
![]()
GLIDE can be used on just one Layer if desired. By default, when GLIDE is selected, both A & B will active. If neither A or B is selected, no GLIDE effect will be heard, and the GLIDE button will turn itself off.
Gliding on one Layer only can be an interesting musical effect
MAIN CONTROLS - Arpeggiator

This button engages Omnisphere’s powerful Arpeggiator. The ARP button simply turns the Arpeggiator on or off. Arpeggiator presets can be loaded from this page by pressing the menu arrow to the ARP button and choosing a preset.
For more details about the Arpeggiator, refer to the Arpeggiator ssection of this guide.

