STACK MODE - Introduction
STACK MODE - Introduction
STACK MODE is a powerful feature designed for
creating splits, layers, and crossfades with up to eight Parts at once. STACK
MODE offers a flexible environment for either live performance or composing. STACK
MODE is especially useful for recording a multi-Part performance using a single
MIDI track in your host sequencer.
Using Latch and Trigger Modes together with Stack Mode allows you to create complex multi-Part performances that can be layered and quantized in real time.
Use STACK MODE instead of LIVE MODE when you want
to create splits and crossfades, and play all the Parts using a single MIDI
channel.
There are three different ways to interact with
Parts using STACK MODE: NOTES, VELOCITY, and CC. Although they all share the
same STACK MODE Grid layout, they are applied very differently from one
another.
Using NOTES, each Part Region is mapped to a MIDI
Note range, allowing you to map splits, layers and positional crossfades across
your keyboard. Using VELOCITY, each Part Region responds to a specific Velocity
range, so no matter where you are playing on the keyboard, different Part
Regions can be triggered by playing harder or softer. Using CC, Part Regions
can be switched and crossfaded using MIDI Control Change messages.
NOTE: STACK MODE works with
multiple patches simultaneously, so it requires a powerful computer to make the
best use of it. To optimize
performance, mute Patch FX like Reverbs and Delays and use the shared Aux Sends
FX instead.
Enabling Stack Mode

To enable STACK MODE, select the Power Button to
the left of the STACK MODE label.
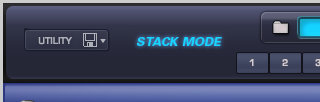
When STACK MODE is enabled, you’ll see “STACK
MODE” displayed in the left side of the Omnisphere header. This will be visible
from any page in the plug-in.
STACK MODE - Presets Menu
STACK MODE - Presets Menu
All STACK MODE settings (except MIDI Channel,
which will always default to “Any”) are saved and recalled with the MULTI,
which means you can setup a MULTI specifically for use with STACK MODE enabled.
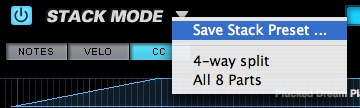
In addition to saving and loading complete
MULTIS, Stack Presets can be independently saved and loaded from the drop-down
menu at the top of the STACK MODE page.
A Stack Preset only saves and recalls the layout
of the STACK MODE Grid. This includes the positions of all added Part Regions,
and the original Part numbers associated to those Regions.
When a Stack Preset is loaded, it will replace
the layout of the STACK MODE Grid. Part Regions will be automatically matched
to the same Part numbers they were assigned when the Preset was saved.
NOTE: Stack Presets do not store
Patches, Part Names, CC assignments, or which setting (NOTES, VELOCITY or CC)
was selected at the time the Stack Preset was saved.
STACK MODE - MIDI Channel Menu
STACK MODE - MIDI Channel Menu
All of the Parts in STACK MODE respond to a
single MIDI Channel, even if the Parts are assigned to different MIDI Channels
on the Mixer page. Use the MIDI
Channel menu to choose which MIDI Channel STACK MODE will respond to.
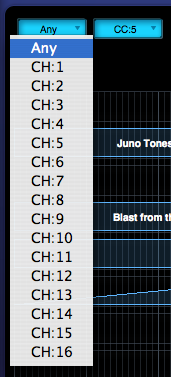
Range Any, CH: 1 – CH: 16
STACK MODE - MIDI CC Menu
STACK MODE - MIDI CC Menu
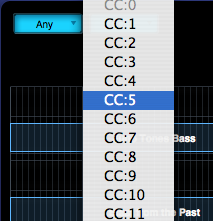
Use the MIDI CC menu to choose which MIDI Control
Change number STACK MODE will respond to when using the CC setting.
NOTE: When using CC, all Parts
added to the Stack Mode Grid will be triggered simultaneously when notes are
played, even if their Regions are outside the CC value range, and not
outputting audio. Therefore, this feature can put a high demand on the CPU.
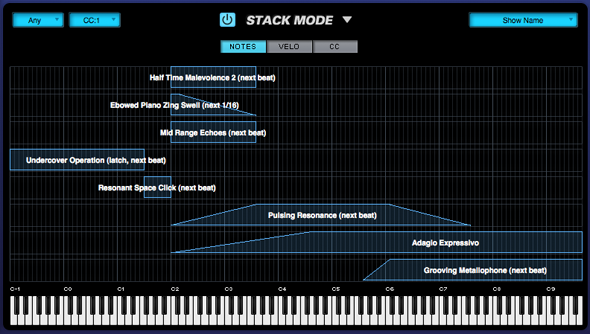
STACK MODE - Grid
STACK MODE - Grid
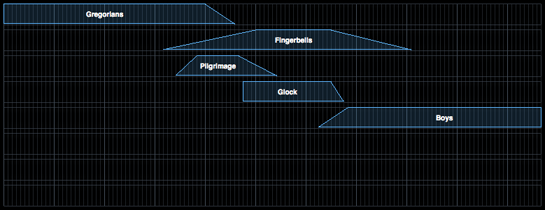
The Stack Mode Grid is made up of 8 horizontal
Rows, each divided by 128 lines corresponding to the full range of possible
MIDI values.
Up to 8 Parts can be arranged on the STACK MODE
Grid as Regions. A Region will always correspond to one Part, and is displayed
horizontally along a Row. Once added to the grid, Regions can be moved, resized
or edited using the Mouse.
One Row can contain multiple Part Regions, but
each Part can only be present in one Row at a time.
STACK MODE - Adding & Removing Parts
STACK MODE - Adding & Removing Parts
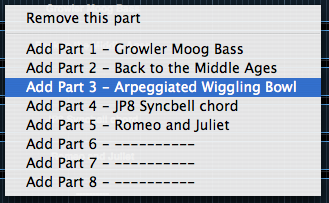
To add a Part, Right/Control-Click on the desired
Row in the Stack Mode Grid, then choose a Part from the menu. All of the Patches loaded into the
current Multi will appear in this menu. Any unassigned Parts will display as “----------“.
NOTE: You can add Parts to the
Stack Mode Grid that have no Patches loaded yet.
To place two (or more) Parts on the same Row
simply Right/Control-Click on a Row again, and select “Add Part” for each Part
that you want to add to that Row. Up to 8 Parts can be added to a single Row,
however it is usually simplest to assign each Part to its own corresponding
Row.
To remove a Part from any Row,
Right/Control-Click on the Region and select “Remove this Part”.
NOTE:
Removing a Part from the STACK MODE grid doesn’t remove that Part from the
Multi, so it can be added back to the grid again if desired. When re-adding a
Part, all previous changes made to its Region (position, width and fades) are
retained when added back to the grid.
STACK MODE - Moving, Crossfading & Resizing Regions
STACK MODE - Moving, Crossfading & Resizing Regions
Moving – To move a Region, click inside the Region and drag
horizontally.
NOTE: You can only drag Regions
horizontally, and not vertically across Rows. To relocate a Part to another
Row, simply add the Part to the desired Row using the Add Part contextual menu.
The Part will relocate, with its Region settings (position, width and fades)
intact.
Resizing – Click and drag the lower right or lower left corner of a
Region to increase or decrease its width. If two Regions are on the same Row
and crossfaded together, resizing will only change the width of the selected
Region.
Fading – To add a fade to a Region, select the upper-right or
upper-left corner of the Region and drag the corner inward. The further the corner is dragged, the
more gradual the ramp and the longer the fade will be.
You can shorten or remove a fade by dragging the
upper corner of the fade outward.

Contiguous & Crossfade – To have contiguous or crossfaded
Regions, both Regions must be on the same Row. Once on the same Row, Regions can be placed side-by-side for
contiguous layout.

To crossfade two Regions, place two Regions on
the same Row. Create a fade on one Region (on the side facing the other
Region), then drag the faded Region toward the other. When the Regions touch,
Omnisphere will automatically create a crossfade.
Dragging inside the crossfaded area will move the
crossfade without changing its length. This will not move the Regions
themselves, although the relative length of the Regions will change
accordingly.
Dragging on the upper corners of the crossfade
will increase or decrease the length of the crossfade, without moving either
Region. Again, the relative length of the Regions will change accordingly.

STACK MODE - Latch & Trigger Modes
STACK MODE - Latch & Trigger Modes

The Latch Mode and Trigger Mode features extend the multi-timbral performance capabilities of Omnisphere, especially when used together with Live Mode or Stack Mode.
They enable real-time creation of complex, multi-Part performances with full synchronization between Parts, and across multiple Omnisphere, Trilian and Stylus RMX instances, without the need for traditional sequencing techniques.
Latch Mode causes notes to be held when played (or toggled off when played again), allowing quick triggering of repeating arpeggiated phrases or sustained sounds, while freeing the hands to play additional notes for layering, or for switching to other Parts to play new phrases on top.
Using Trigger Modes, incoming MIDI notes can be quantized in real-time, making it very easy to experiment and improvise along with other Parts and clocked sources without losing synchronization. These features are a lot of fun to use for jamming and building up ideas quickly!
Used together, they enable a wide range of creative performance, live remixing, and composition techniques to discover and explore.
STACK MODE - Latch Mode
STACK MODE - Latch Mode
When Latch Mode is enabled for a Part, repeatedly playing a note will toggle the note on and off. When it is toggled on, the note will continue to sustain, even if the note is released. Playing the same note again will toggle it off.
When the Stack Mode page is open, you can access the Latch Mode setting for a Part by right/control-clicking on the Part Region. Select “Latch Mode” from the context menu to toggle Latch Mode on or off for the Part.
NOTE: A Part’s Latch Mode status can also be viewed & changed from the EDIT Page using the controls in the Footer or from the LIVE MODE page using the Latch Mode View button. The Latch Mode Icons are MIDI-learnable, so you can assign a hardware control to remotely enable or disable Latch Mode for a Part.
Latch Mode allows rapid and creative layering of multiple notes or Parts. Using splits, you can also play along using other unlatched Parts in Stack Mode. Latch Mode is extremely useful when working with rhythmic sounds, and used together with Trigger Modes allows one-shot triggering of sounds quantized in real-time.
Latch Mode is set independently for each of the eight Parts. It is also independent from Stack Mode, so Stack Mode does not need to be enabled for Latch Mode to be active.
Viewing & Enabling Latch Mode
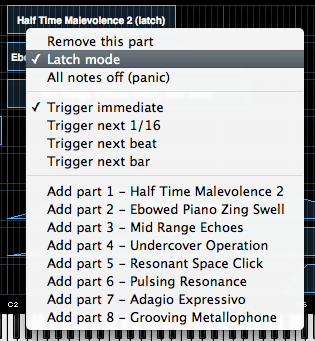
To enable Latch Mode for a Part, control/right-click its Part Region, and select the “Latch Mode” option from the context menu.
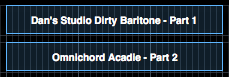
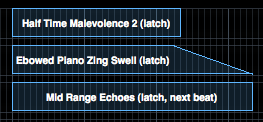
When Latch Mode is enabled for a Part, a checkmark will appear next to the Latch Mode menu option, and the word “Latch” will be appended to the Part Name on the Stack Mode grid.
To disable Latch Mode for a Part, select “Latch Mode” again from that Part’s context menu.
When Latch Mode is disabled for a Part, the Latch Mode menu option will be unchecked, and the word “Latch” will no longer be appended to the Part Name.
NOTE: Disabling Latch Mode for a Part while it’s playing will immediately send an “All Notes Off” message to the Part. The tails from FX and release stages from envelopes will continue to decay. The All Notes Off command will apply to all notes that are playing on that Part.
All Notes Off
Sometimes when using Latch Mode, it’s possible to lose track of which notes are latched, or you might have multiple Parts playing in Latch Mode that you want to stop simultaneously.
The All Notes Off command will send an “All Notes Off” message to all 8 Parts at once. All Parts will stop playing, regardless of their Latch status. FX tails and release stages from envelopes will continue to decay, so that the cut off is not unnaturally abrupt.
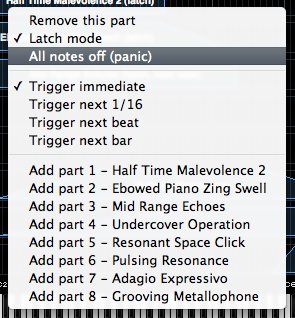
To access the All Notes Off command, control/right-click on a Part Region, and select “All Notes Off” from the context menu.
NOTE: You can also access the All Notes Off command by using the All Notes Off button on the LIVE MODE page. The All Notes Off button is MIDI-learnable, which allows you to trigger it using a hardware controller. This is especially useful when using Latch Mode together with Stack Mode.
NOTE: If you have multiple Parts playing using Latch Mode and only want to stop one Part, disable Latch Mode only for that Part.
STACK MODE - Trigger Mode
STACK MODE - Trigger Mode
Trigger Mode controls the playback timing of incoming MIDI notes, providing real-time quantization as those notes are played.
When the Stack Mode page is open, you can access the Trigger Mode settings for a Part by right/control-clicking on the Part Region.
NOTE: Trigger Mode can also be accessed from the LIVE MODE page using the Latch Mode View button, or from the EDIT Page using the controls in the Footer.
When playing complex phrases or rhythmic sounds along with other sequences, it can be difficult to sync those performances. Trigger Mode solves these problems by quantizing live MIDI input. With Trigger Modes other than Immediate selected, the playback from each incoming MIDI note is delayed until the the next point on the bar/beat grid is reached. This makes it much easier to play in a live performance setting with complete synchronization.
Trigger Mode controls the playback start time of MIDI notes played live via a MIDI controller or from MIDI notes sent from a MIDI track in the host sequencer.
Trigger Modes are set independently for each of the eight Parts. Trigger Modes are also independent from Stack Mode, so Stack Mode does not need to be enabled for Trigger Modes to be active.
Using Trigger Modes in Stack Mode
Using the splits, layers and crossfades in Stack Mode together with Trigger Mode quantizing allows for very complex and interesting performance possibilities.
One simple example is to setup a split with an arpeggiated synth bass on the lower keys, and another arpeggiated sound on the upper keys. Playing them together in sync can be really difficult. Setting the Trigger Modes to Next 16th for both Parts would quantize them together in real time as you played, so your arpeggiated phrases will always sync perfectly.
Trigger Modes can also be used while browsing and auditioning sounds. If you have selected a Trigger Mode other than Immediate for the Part, the sounds will be real-time quantized and will play in sync with the host or other clocked source as you audition them.
Viewing & Selecting Trigger Modes
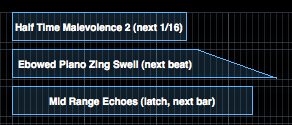
When a Trigger Mode other than Immediate is selected for a Part, the name of the selected Trigger Mode will be appended to the Part Region name.

To select or change the Trigger Mode for a Part, control/right-click its Part Region, and select the desired Trigger Mode from the context menu. A checkmark will appear next to the selected Trigger Mode.
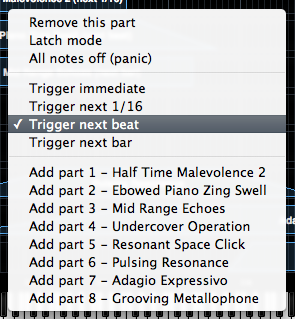
Trigger Modes
Immediate: This is the default Trigger Mode. MIDI input is not quantized, and playback of MIDI notes is immediate.
NOTE: When Immediate is selected, no Trigger Mode name will be appended to the Part Name.
Next 16th: this option delays the playback of incoming MIDI notes to the next 16th note. In other words, notes are quantized in real time to the next 16th note. If you play ahead of the next 16th, there may be a slight delay before the note sounds. This delay will be a maximum of a 16th note at the current tempo. This mode makes it easy to play quick phrases in perfect sync with other Parts or clocked sources.
Next Beat: this option delays playback to the next beat. If incoming MIDI notes arrive ahead of the next beat, the delay is a maximum of one beat. Next Beat mode makes it very easy to trigger rhythmic patches in perfect sync, and when used together with Latch Mode, for layering phrases that are quantized to the beat in real time.
Next Bar: delays playback until the next bar. If MIDI messages arrive ahead of the next bar, the delay is a maximum of one bar. This mode is especially useful if you want to synchronize phrases on the downbeat of a measure. You can press a note anytime in the previous bar and it will wait until the next bar to play.
NOTE: The selected Trigger Mode also affects a Part’s Arpeggiator, LFOs and Envelopes. These will also be delayed until the note itself is triggered.
STACK MODE - Operation Modes
STACK MODE - Operation Modes

There are three ways that Part Regions can be
used in STACK MODE: NOTES, VELO and CC. Only one of these can be active at a
time.
STACK MODE OPERATIONS MODES - Notes
STACK MODE OPERATIONS MODES - Notes
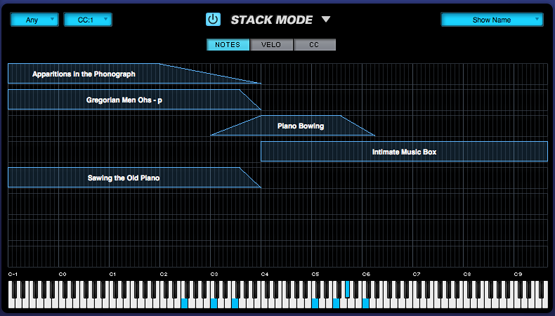
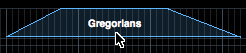
When NOTES is selected,
Part Regions are mapped to a MIDI Note range, allowing you to map splits,
layers and positional crossfades across the keyboard. Each of the 128 lines in
the grid correspond to a MIDI Note number, and Regions can be mapped over a
ten-octave range. When NOTES is selected, a mini-keyboard is displayed at the
bottom of the Stack Mode Grid

NOTE: The
mini-keyboard will highlight notes in blue as they are played. Notes
highlighted in red are notes that have been MIDI Note Learned in LIVE MODE, and
are shown for reference only.
STACK MODE OPERATIONS MODES - Velocity
STACK MODE OPERATIONS MODES - Velocity
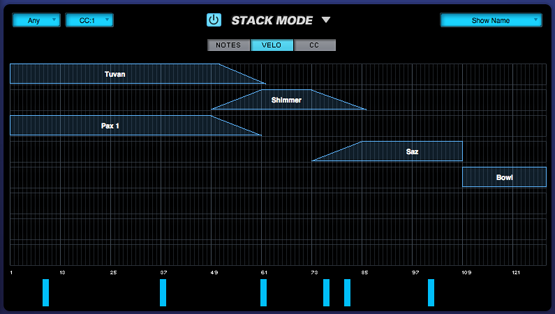
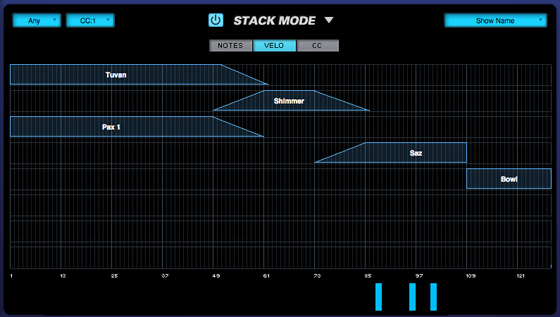
When VELO is selected,
Part Regions are mapped to a specific Velocity range. The mini-keyboard is not displayed. Instead, the horizontal
axis represents the 128 Velocity values. This allows Velocity switching and crossfading of Parts. For example,
which Part is played depends on how hard or soft the MIDI keyboard is played.
The horizontal axis
shows white reference numbers for Velocity values and also displays incoming
MIDI Note messages. The markers on
the horizontal axis range from 1-127. When you play notes, their Velocity
values will be displayed by blue vertical bars.

Parts on the left side
of the Grid will be triggered at lower Velocity levels, while at higher
Velocity, Parts on the right side of the Grid will be triggered.
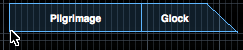
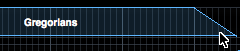
In the example below,
all the Parts will be triggered except the Region at the far right, which is
mapped to a Velocity range of 109-128.
In this example, playing
at lower Velocity values triggers the two Parts on the left.

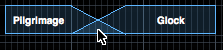
In this example, playing
at medium Velocity values crossfades to the Region in the center of the Grid.
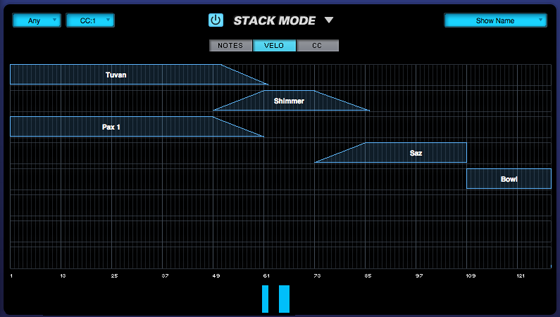
Finally, as Velocity
increases further, the next Region to the right will be triggered by higher
Velocity values.
STACK MODE OPERATIONS MODES - CC
STACK MODE OPERATIONS MODES - CC
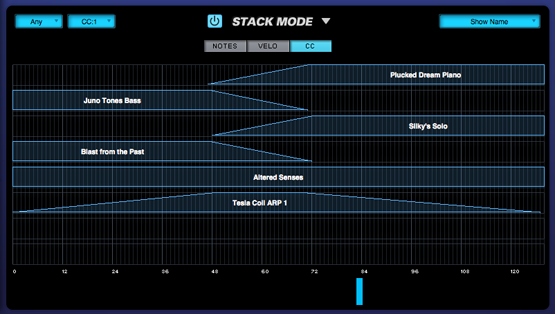
When CC
is selected, Part Regions can be switched or crossfaded using MIDI CC messages.
This is useful for crossfading patches from a MIDI hardware slider or knob.
Each Region can be mapped to specific values across the MIDI CC’s range. The
MIDI Control Change number that STACK MODE uses is chosen from the MIDI CC menu
on the STACK MODE page.

Once
the MIDI Control Change Number has been chosen, all of the Regions will respond
to that CC number. The current MIDI
CC value is displayed at the bottom of the Stack Mode Grid, similar to VELO
mode, but only the current value is visible. While holding notes down, the
value display will update as you sweep across the range of CC values.
NOTE: When using CC, all Parts
added to the Stack Mode Grid will be triggered simultaneously when notes are
played, even if their Regions are outside the CC value range, and not
outputting audio. Therefore, this feature can put a high demand on the CPU.
NOTE:
MIDI CC 32 (bank select) is not available.
STACK MODE - Display Menu
STACK MODE - Display Menu
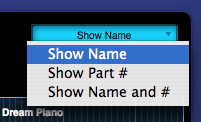
The Display Menu allows you to choose which
information is displayed with each Region in the Stack Mode Grid.
SHOW NAME
Displays only the Part Name.
SHOW PART #
Displays only the Part Number. This corresponds
to the Part Number on the Mixer Page.
SHOW
NAME and #
Displays both the Part Name and the Part Number.