BROWSER - Projects
A Project is a user-defined collection of sounds that are organized under a single, named group. This can be applied in many useful ways. For example Projects can be created and named according to jobs that you are working on, or created for different sessions, songs or styles.
You can add Multis, Patches and Soundsources to a Project. The Project system is flexible and easy to manage, and since you name and populate the Projects yourself when creating them, they can be organized in ways that are most meaningful to you.
When a Project is selected in the Browser, only the sounds that have been added to that Project will be displayed. This gives you instant access to filtered and organized selections of sounds.
Projects work well together with Favorites, offering additional sorting options, and with Search and Attribute Filters for further managing the display of your Project’s sounds.
Creating, Managing, and Accessing Projects
The Project Menu

The Project button, which is at the footer of all three of Omnisphere's Browsers, displays the Project Menu:
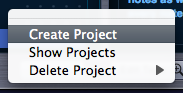
The Project Menu provides all of the options needed to create, manage and access Projects. Using the Project Menu, you can Create Projects, Delete Projects, add sounds to or remove sounds from a Project, and Show Projects in the Browser.
Create a Project

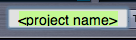
Select “Create Project” from the Project Menu, type a name for the Project into the text field, and press Return/Enter on your keyboard.
 spacer
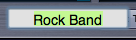
The Project is now created, and available to add sounds to.
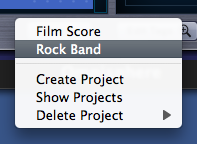
After creating a Project, its name will appear in the top section of the Project Menu.
Add a sound to a Project
To add a sound to a Project, first select the sound in the Browser that you wish to add. Next, open the Project Menu and select the Project name you wish to add the sound to. That’s it!
Whenever that sound is selected, if you open the Project Menu you will see a checkmark next to that Project name, indicating that the selected sound is in that Project.
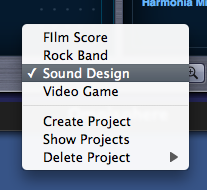
A sound can be added to multiple Projects. If a sound has been added to multiple Projects, you will see checkmarks next to the names of all the Projects it has been added to.
This makes it easy to quickly see if a sound has been added to one or more Projects.
Browse Projects
Once you have created one or more Projects and added sounds to them, you can then quickly browse your Projects to find and select the specific sounds you added to them.
To browse your Projects, select “Show Projects” from the Project Menu.
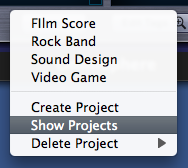
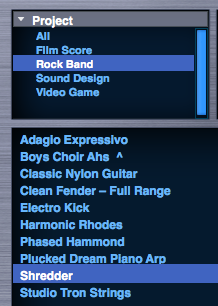
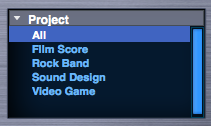
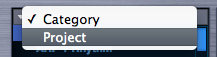
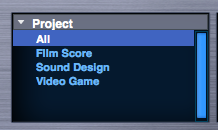
The left-most attribute filter will change from "Category" to "Project", and all of your Projects will show up in the left-most attribute column. Select a Project from the Project list, and your Browser will display only the sounds contained in that Project.
Select “Show Projects” from the Project Menu again, and the attribute filter will return to the Category view.
You can also switch between displaying Projects or Categories by selecting the left-most attribute filter menu, and selecting Project or Category.
Remove a sound from a Project
To remove a sound from a Project, first select the sound you wish to remove by selecting it in the Browser. Next, open the Project Menu and select the Project name you wish to remove the sound from (there should be a checkmark next to the Project name). To confirm that the sound was removed from the Project, select the Project Menu again and confirm that the checkmark was removed.
Delete a Project

To delete a Project, open the Project Menu and select the Project you wish to delete from the “Delete Project” sub-menu. A confirmation popup will appear, asking you to confirm the deletion. Selecting OK will delete the Project.
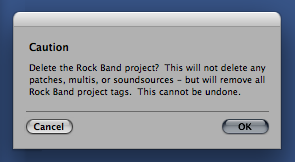
Deleting a Project doesn’t remove or delete any sounds from the library. It simply removes the tags assigned to that Project. If you have the same Project also being used in the Multi, Patch and Soundsource Browsers, you will have to delete the Project separately in those Browsers.